Complete Guide · Free on Google Play

How to Use
Rupix Finance Tracker

A step-by-step walkthrough of the main features: add expenses, set budgets, track bills, save for goals, plan trip budgets, track your portfolio, manage udhaar, capture bank alerts, view spending reports and share with family. Your entries stay on your phone by default, and your financial entries are not uploaded unless you turn on Family Hub Cloud Mode or use Udhaar.

Complete Walkthrough

Every step, explained

Real screenshots from the app. Each step starts with exactly where to tap, counted from the moment you open the app. Download it and follow along.

01

Install & Sign In

How to get there

  1. Install Budget & Expense Tracker from Google Play and open it
  2. First launch only: swipe through the 3 intro slides and tap Get Started (or tap Skip at the top-right)
  3. On the login screen, tap Sign in with Google, or use the Email tab (email address + password)
  4. No account yet? Tap Sign Up at the bottom and choose With Email

On first launch you see three short intro slides, then the login screen titled Budget & Expense Tracker. Tap Sign in with Google for the quickest start, or use the Email tab with your email address and password (there is a Forgot Password? link). If a security check appears, complete it, then tap Continue. New users tap Sign Up, register With Email (full name, email and password) and then confirm the link sent to their inbox. Signing in with a mobile number and SMS code is not available yet, so use Google or email. The app never asks for your bank login. After you sign in once, the app opens straight to Home.
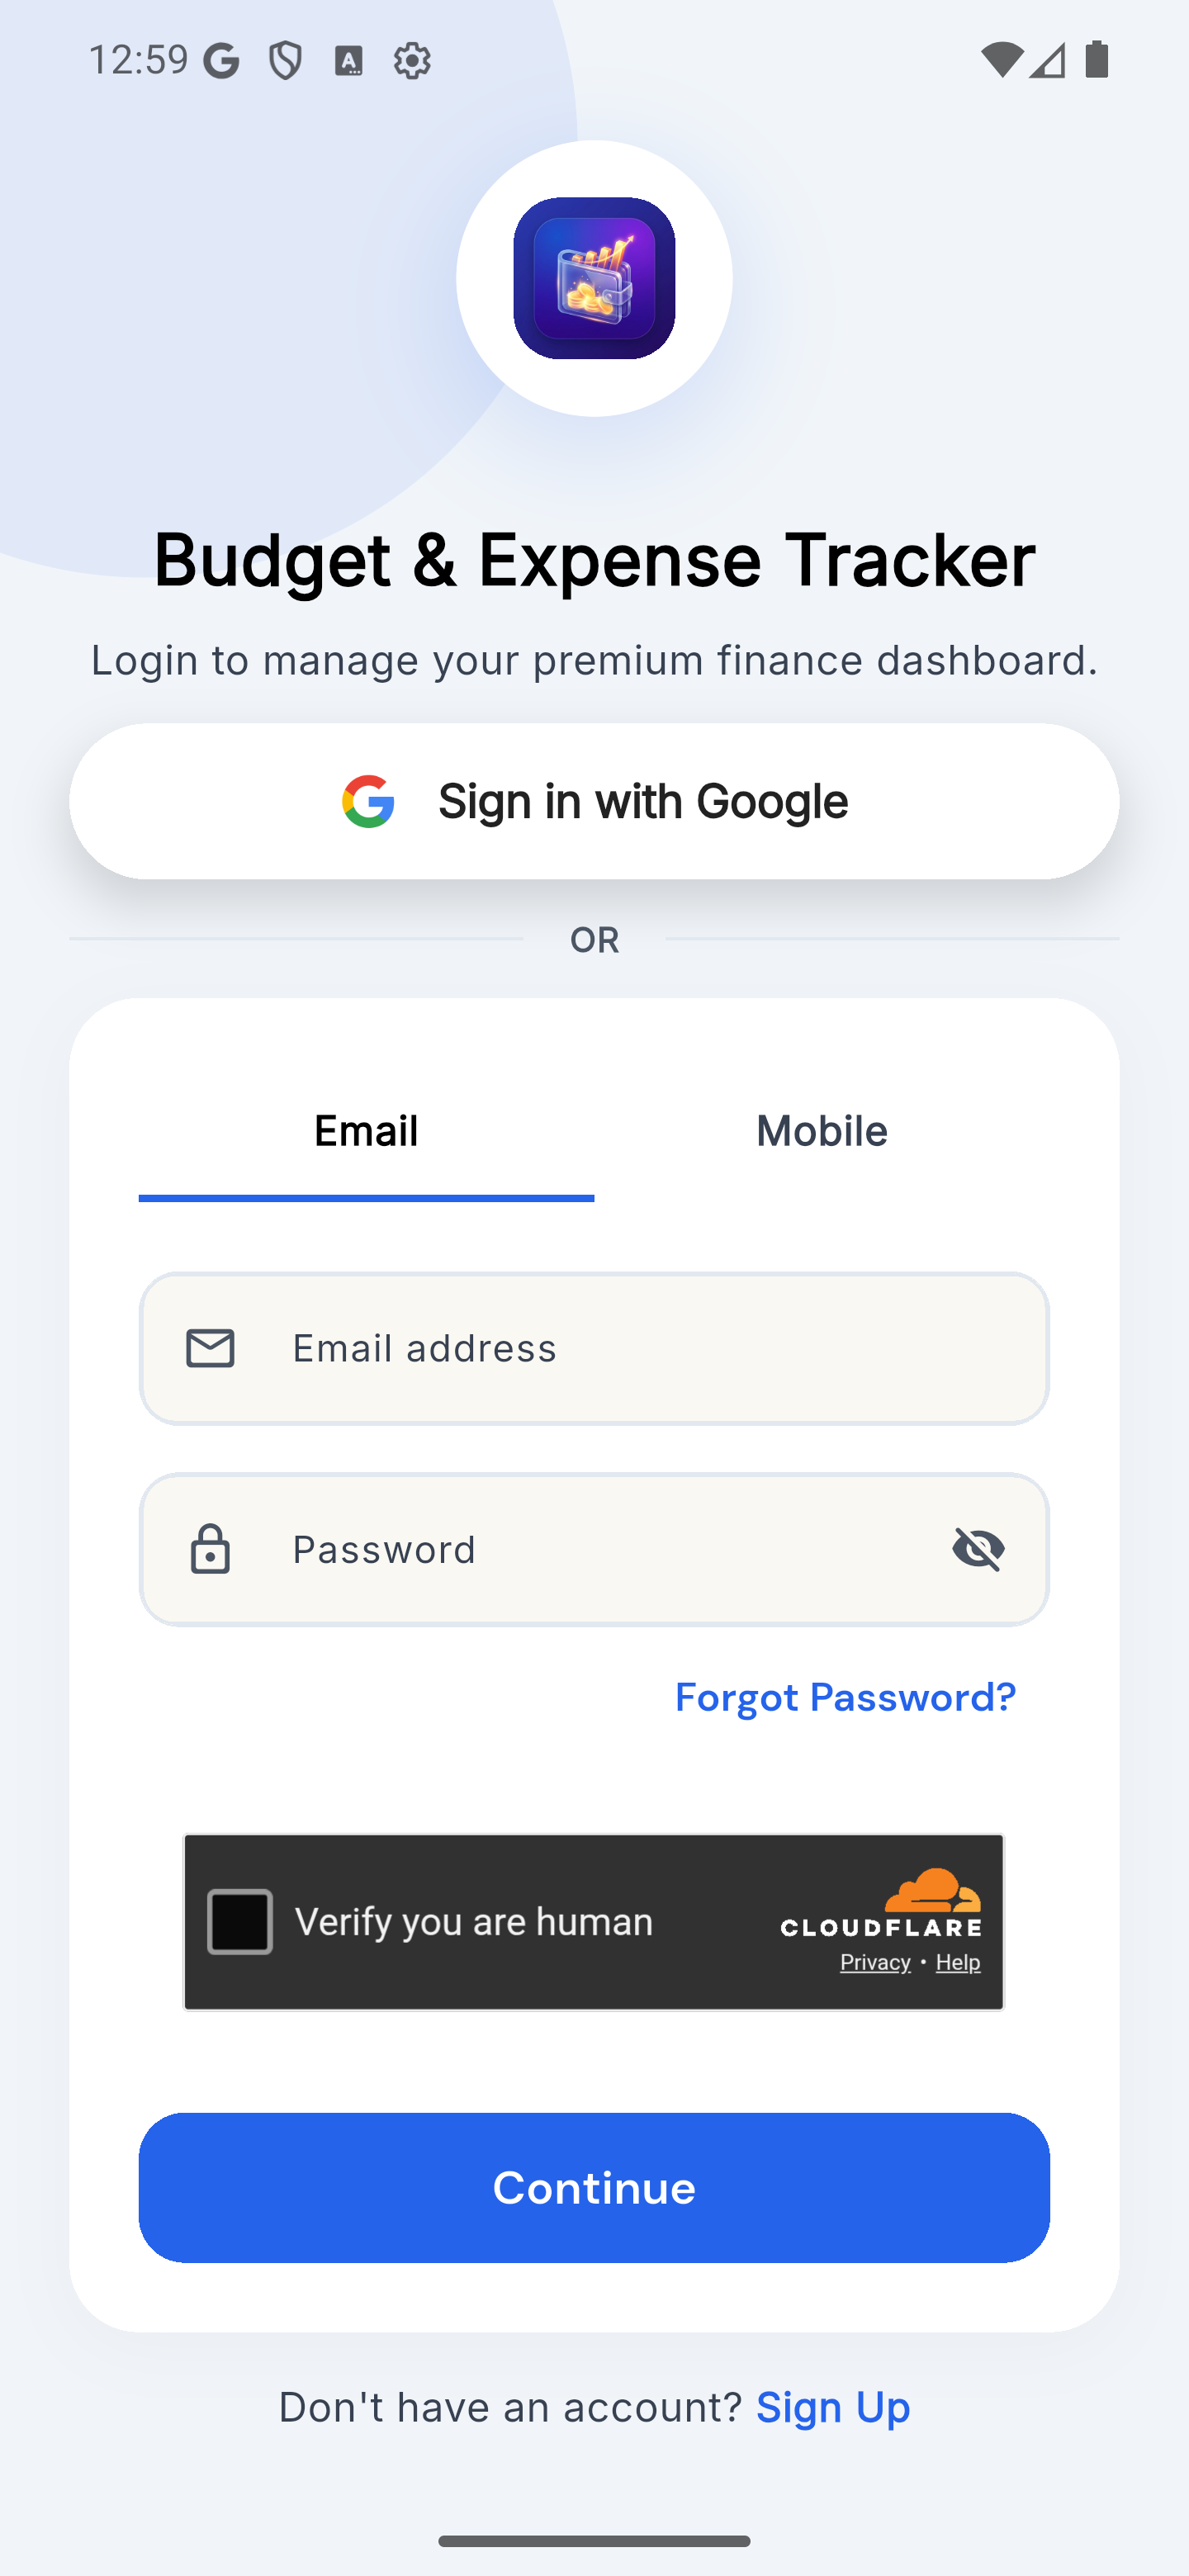
Login screen with the Sign in with Google button, Email and Mobile tabs, email and password fields, a Forgot Password? link, a “Verify you are human” check, the Continue button and a Sign Up link
Login screen with the Sign in with Google button, Email and Mobile tabs, email and password fields, a Forgot Password? link, a “Verify you are human” check, the Continue button and a Sign Up link
02

Add an Expense

How to get there

  1. Open the app (you land on Home)
  2. Tap the round + button at the bottom-right (it appears on Home and Reports)
  3. The Add Expense form opens

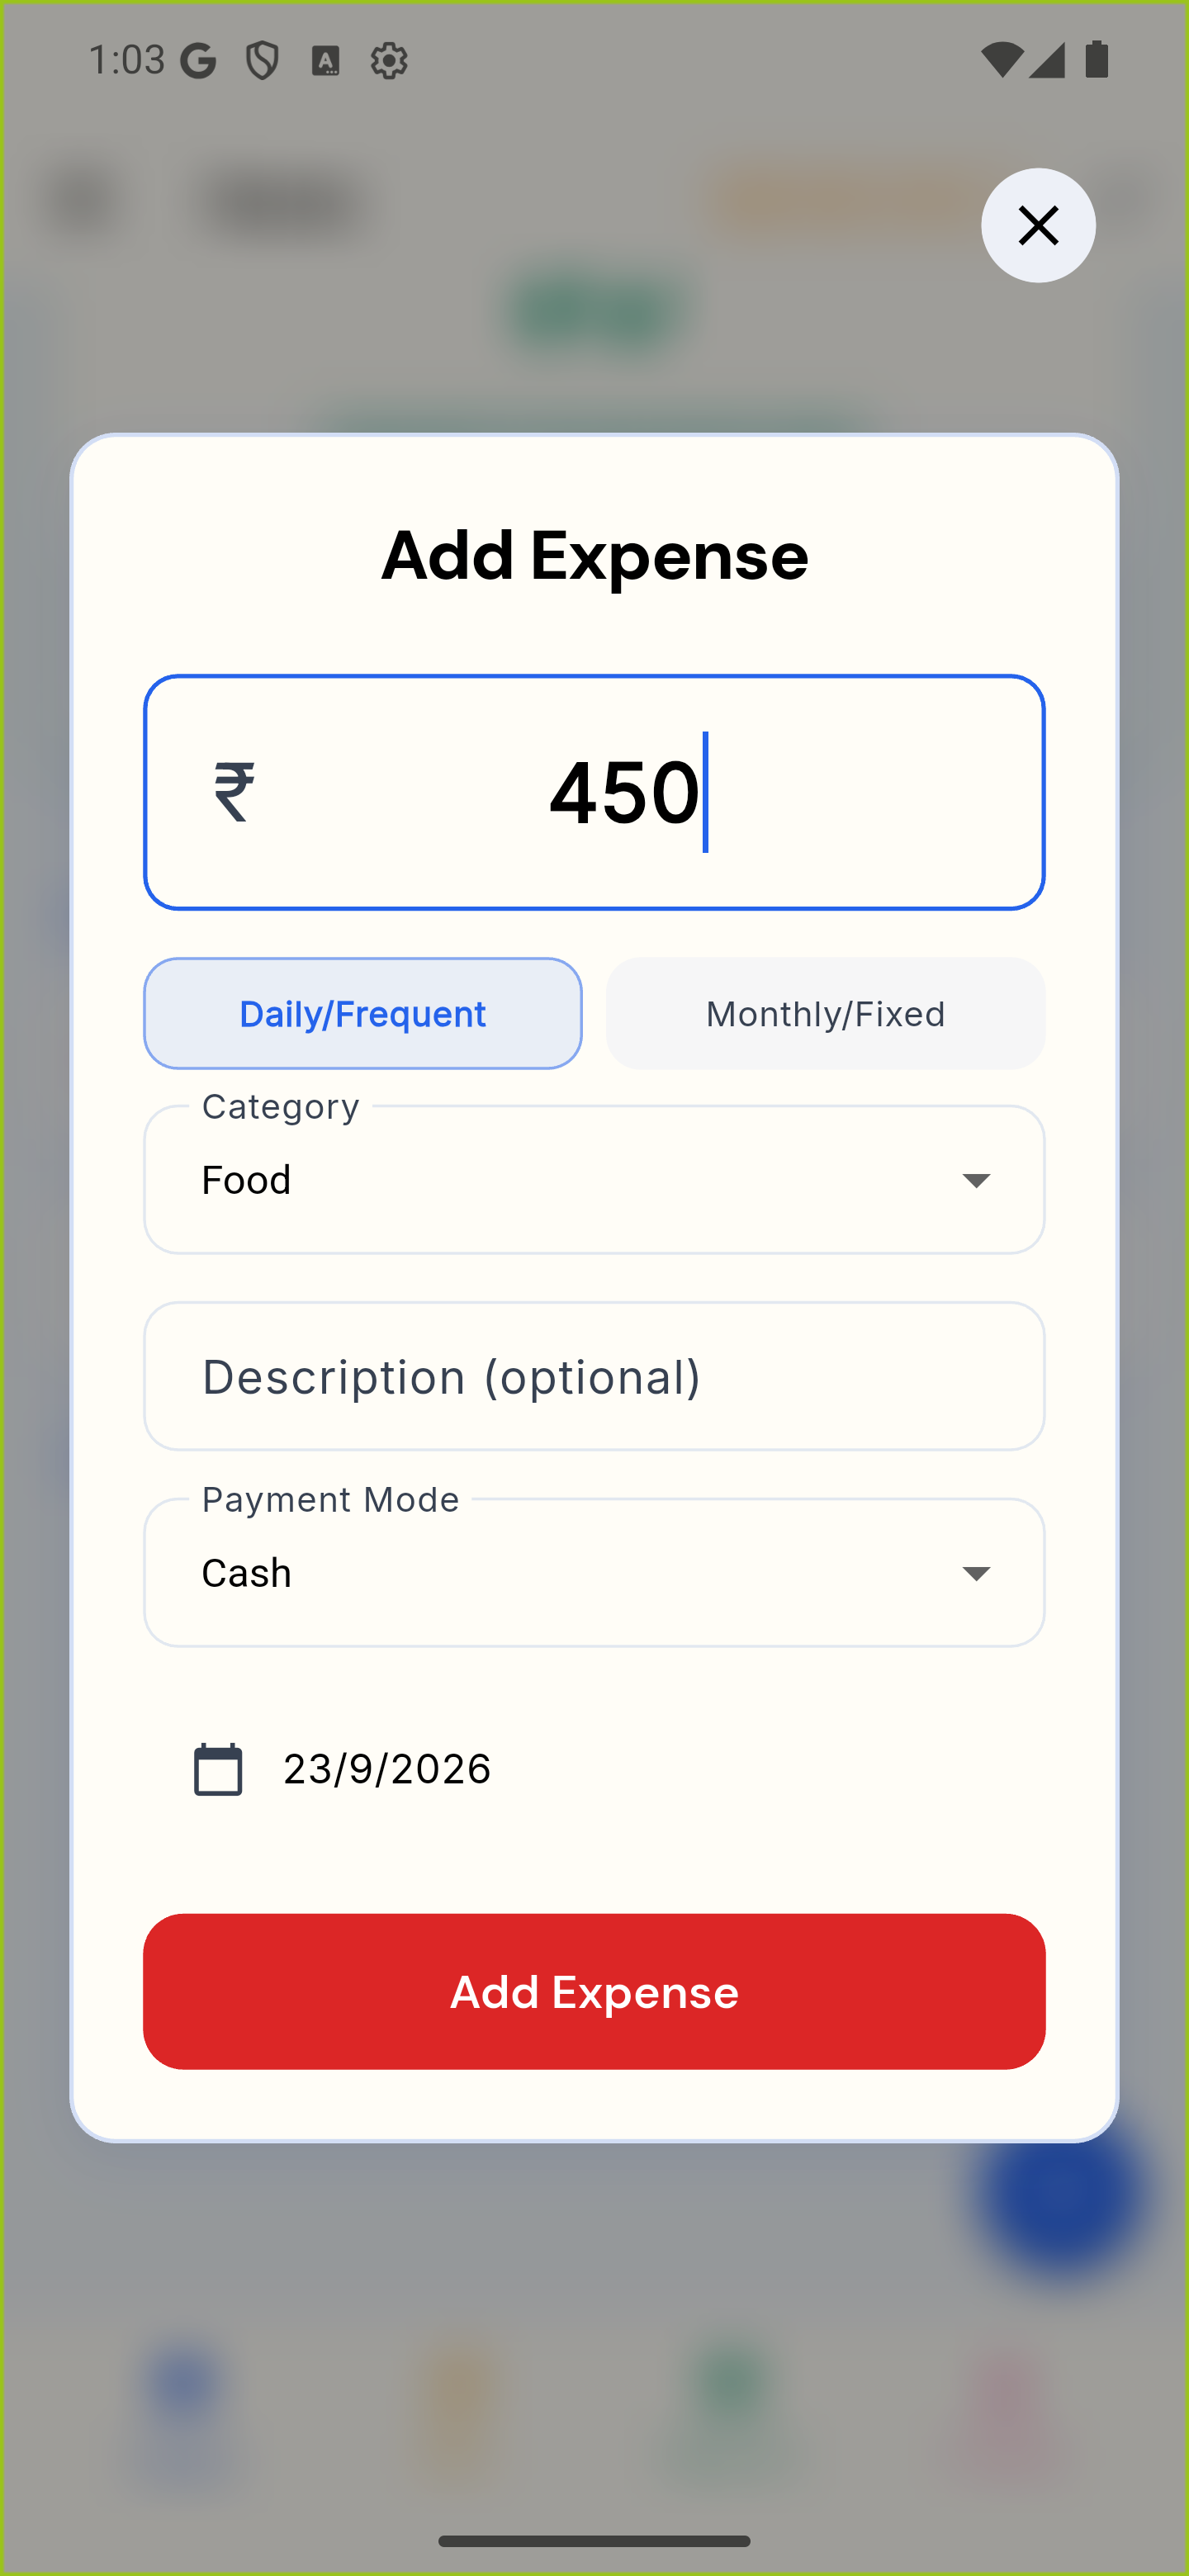
Enter the amount, choose Daily/Frequent or Monthly/Fixed, pick a Category and add an optional description. Choose a Payment Mode: Cash, Bank/UPI, Credit Card or Wallet by default (you can edit this list in Profile → Dropdown Customization). For non-cash modes, an account picker appears if you have added accounts in ☰ → Wallet, and it pre-selects your primary account. Tap the date to change it, optionally tag a trip if you have created one, then tap Add Expense. The + button records expenses only. Income is logged automatically on your pay day from ☰ → Financial Profile, or when you confirm an income alert in Auto-track. Entries appear on Home and in the Bills tab, which has search and month filters. Tap an entry to edit it, or swipe it left to delete it (current month only).

Add Expense form with ₹450 entered, Daily/Frequent and Monthly/Fixed options, Category (Food), an optional description, Payment Mode (Cash), the date and the Add Expense button

Add Expense form with ₹450 entered, Daily/Frequent and Monthly/Fixed options, Category (Food), an optional description, Payment Mode (Cash), the date and the Add Expense button

03

Set Up Budgets

How to get there

  1. Open the app
  2. Tap the ☰ menu at the top-left
  3. Tap Budgets
  4. Tap Add Budget at the bottom-right

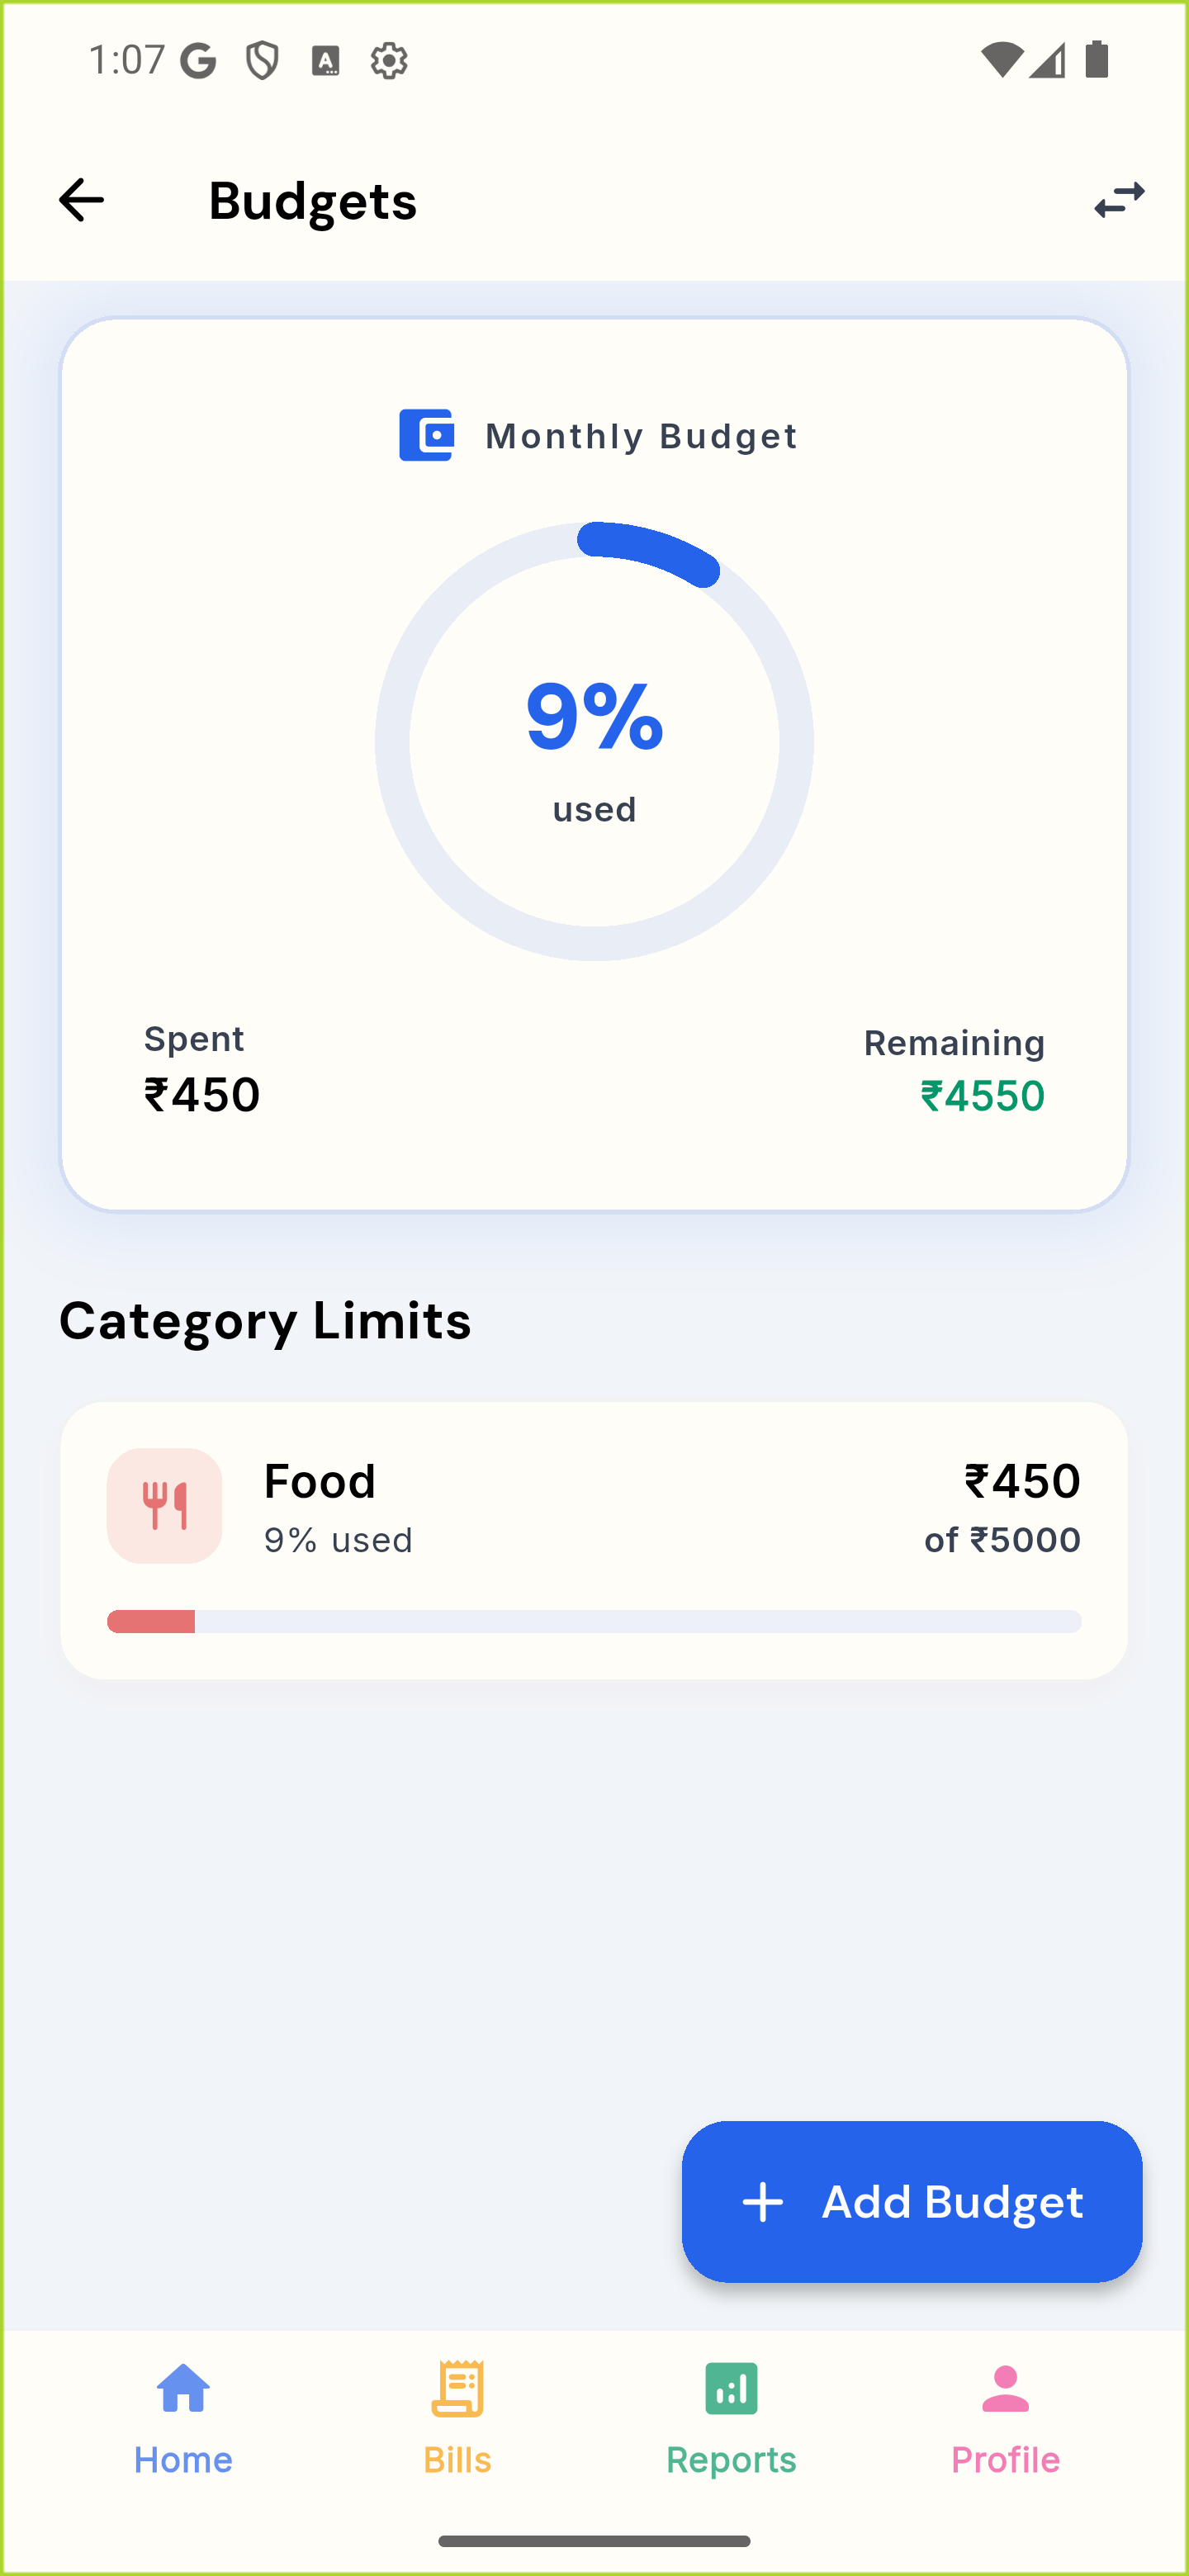
The Budgets screen opens with a Monthly Budget ring showing how much of your combined limits you have spent this month, with Spent and Remaining underneath. Tap Add Budget to open New Budget Limit. Pick a category (Food, Transport, Shopping, Entertainment, Health, Rent, Bills, Utilities, Education or Other) or Custom to type your own, enter the Monthly Limit and tap Set Budget. Each card under Category Limits shows what you have spent against the limit, with a progress bar and % used; once you reach the limit, the bar turns red and the label reads Over budget! The main ring turns red above 90%. Budgets cover the current calendar month, and your first three also appear in the Budget Watchlist on Home. The back arrow at the top-left returns you to Home.

Budgets screen with the Monthly Budget ring at 9% used (Spent ₹450, Remaining ₹4550), a Food limit card showing ₹450 of ₹5000, and the Add Budget button

Budgets screen with the Monthly Budget ring at 9% used (Spent ₹450, Remaining ₹4550), a Food limit card showing ₹450 of ₹5000, and the Add Budget button

04

Track Recurring Bills & EMIs

How to get there

  1. Open the app
  2. Tap the ☰ menu at the top-left
  3. Tap Recurring
  4. Tap Add at the bottom-right

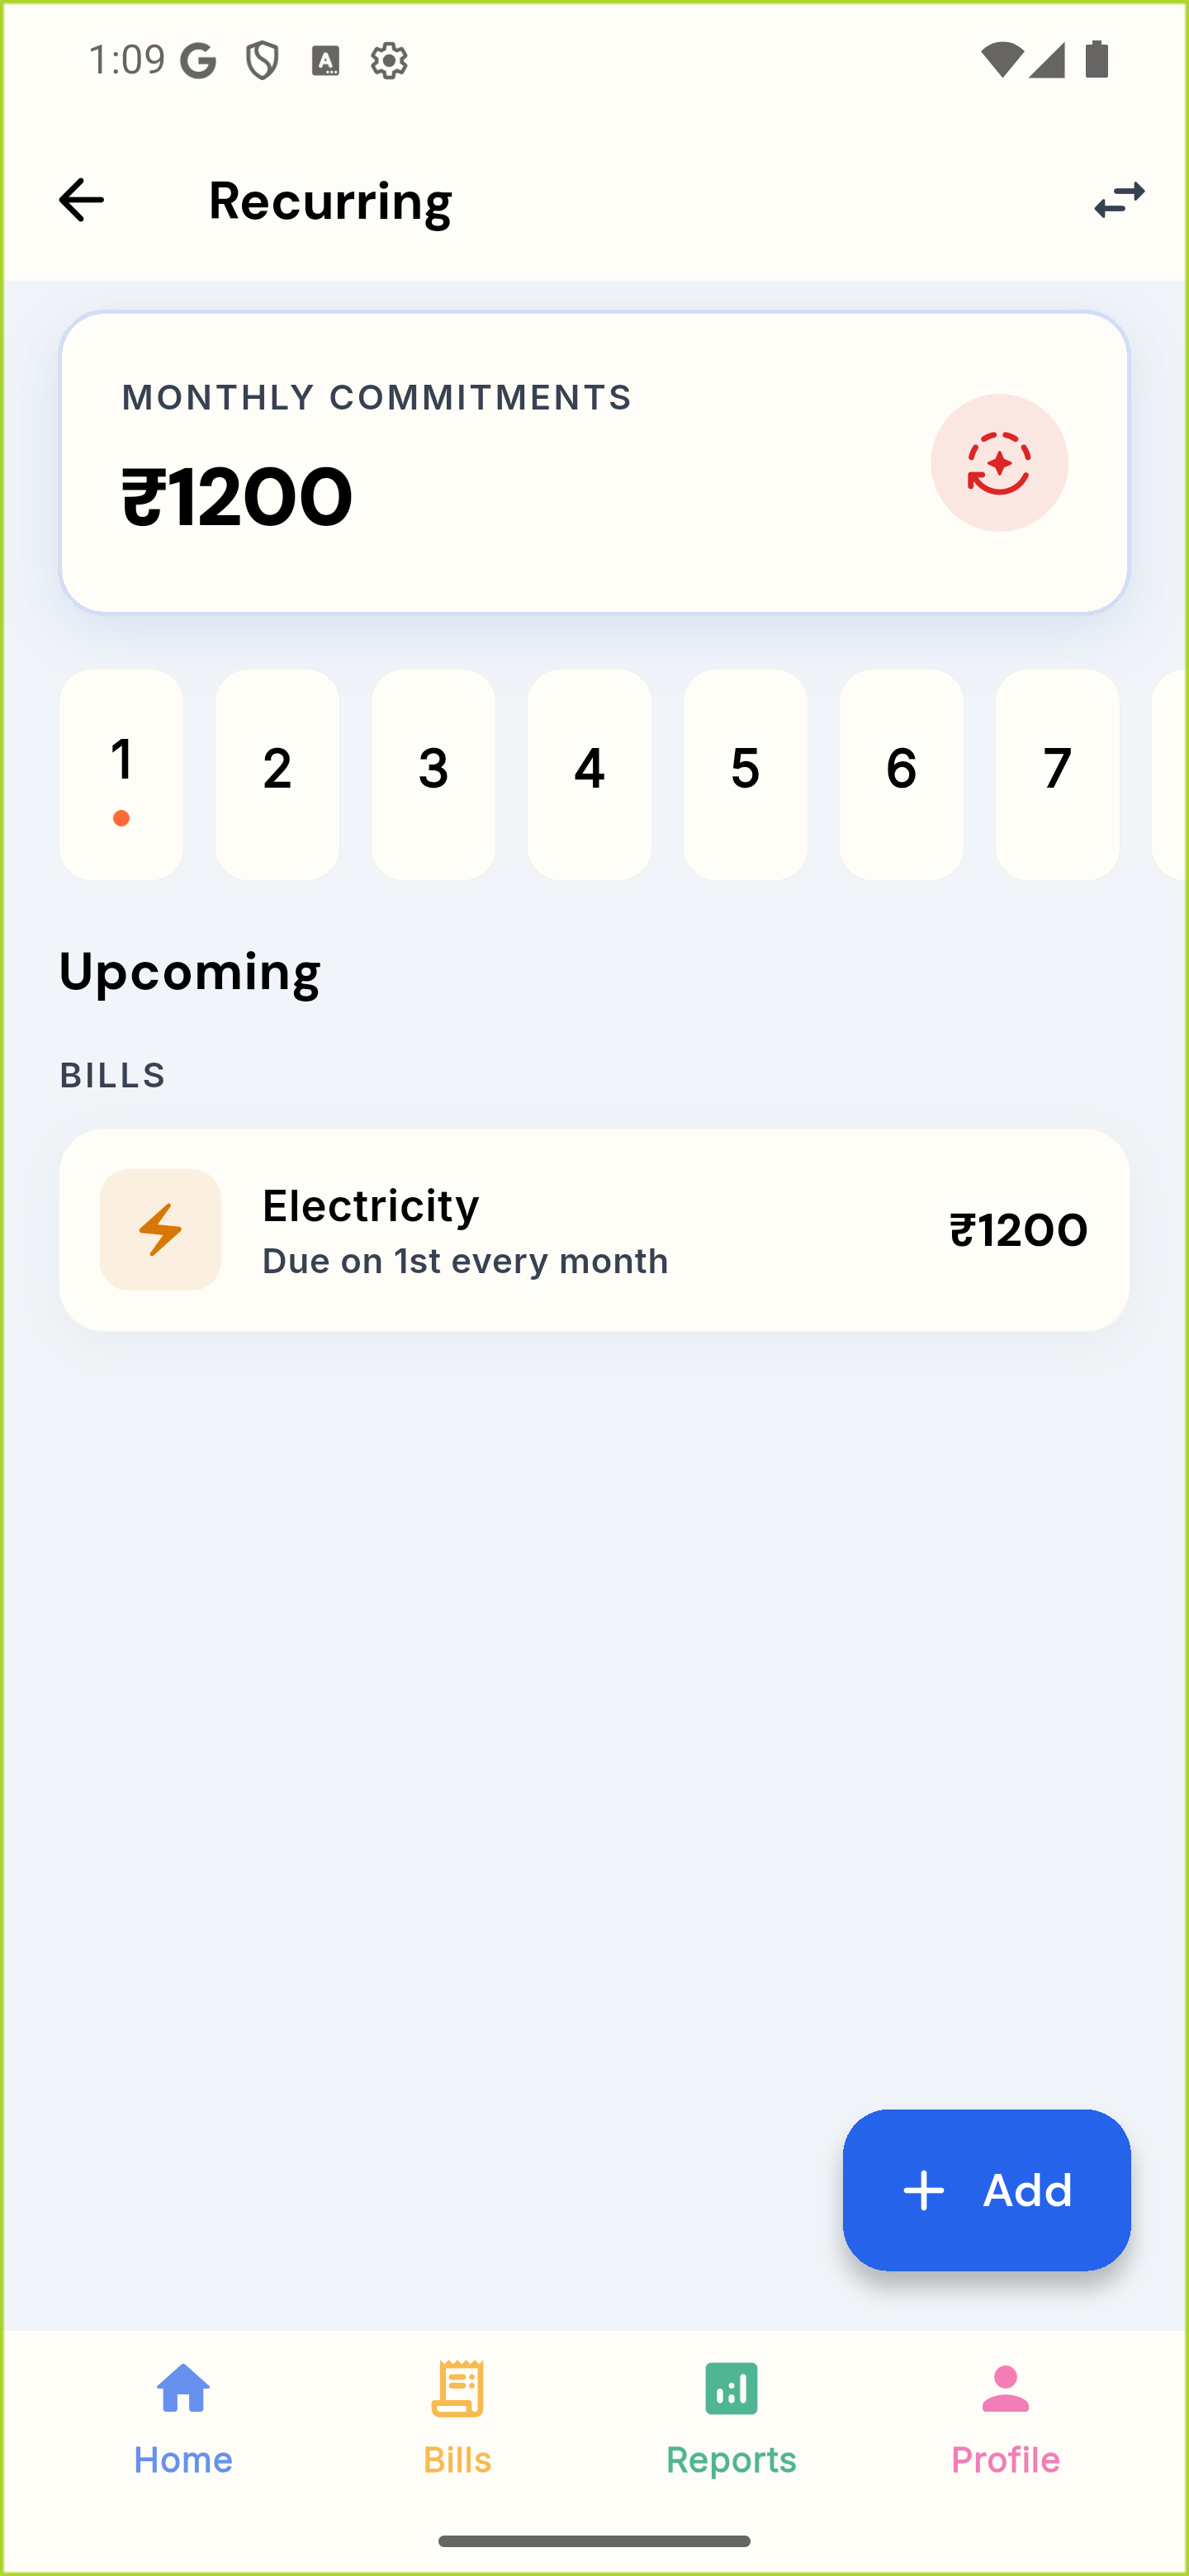
Recurring shows your Monthly Commitments total, a scrollable 1–31 day strip with a dot on every due day, and an Upcoming list grouped by category. Tap Add to open Add Recurring Cost. Choose a type (Loan / EMI, Utility Bill, Subscription, Credit Card or Other), enter a description, the Amount per month and the Due day of month. If you have added accounts in ☰ → Wallet, choose one under Debit from (the first account is pre-selected). Tap Add Recurring Cost to save; each item then reads Due on the Xth every month. Swipe an item left to delete it. There is no undo. Recurring costs are a reminder list and are not added to your transactions automatically, so log each payment with + when you pay. Regular income such as salary is set up separately in ☰ → Financial Profile.

Recurring screen with a Monthly Commitments total of ₹1200, the day strip with a dot on day 1, an Electricity bill due on the 1st every month, and the Add button

Recurring screen with a Monthly Commitments total of ₹1200, the day strip with a dot on day 1, an Electricity bill due on the 1st every month, and the Add button

05

Savings Goals

How to get there

  1. Open the app
  2. Tap the ☰ menu at the top-left
  3. Tap Savings Goals
  4. Tap Add Goal at the bottom-right

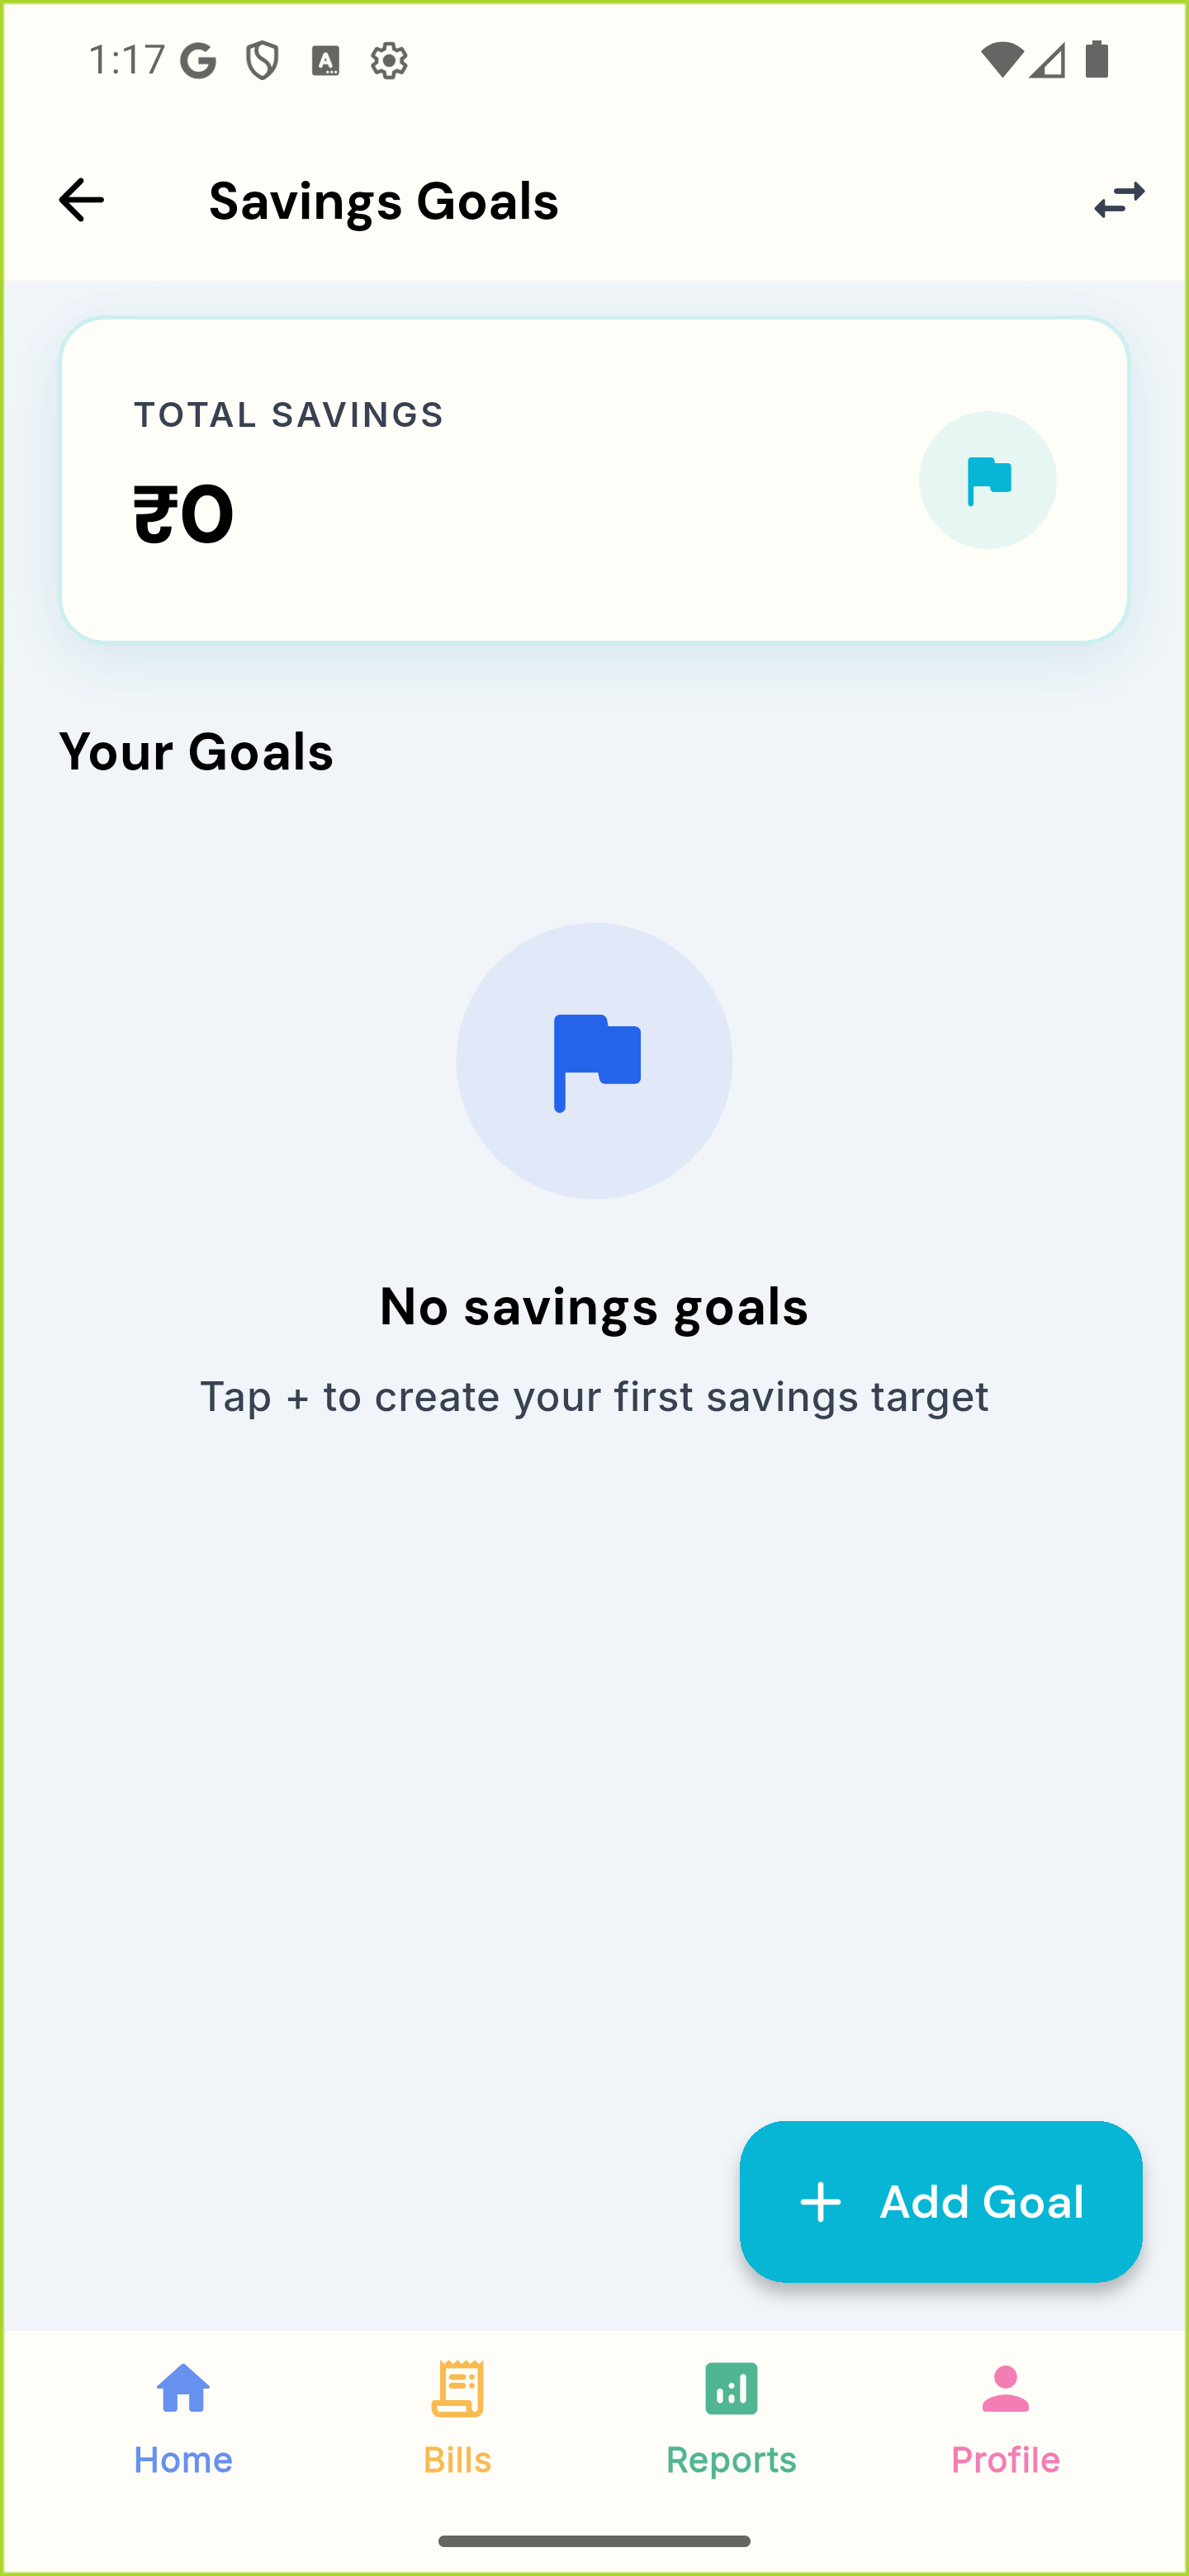
Savings Goals opens with a Total Savings card showing the amount saved across all your goals. Tap Add Goal to open New Savings Goal. Enter a goal name, a Target Amount, an optional Already saved amount and a target date (one year ahead by default), then tap Create Goal. Each goal card shows saved against target, a progress bar, % complete, the amount still to go, and the days left (or Overdue). Tap a card to add money to it. Swipe a card left to delete it; there is no confirmation. The card colour comes from words in the goal name, such as car, home, trip, phone or emergency. When a goal reaches its target it turns green and reads Target achieved!

Savings Goals before any goal is added: Total Savings ₹0, the “No savings goals” message and the Add Goal button

Savings Goals before any goal is added: Total Savings ₹0, the “No savings goals” message and the Add Goal button

06

Travel Space — Trip Budgets

How to get there

  1. Open the app
  2. Tap the ☰ menu at the top-left
  3. Tap Travel
  4. Tap New Trip at the bottom-right

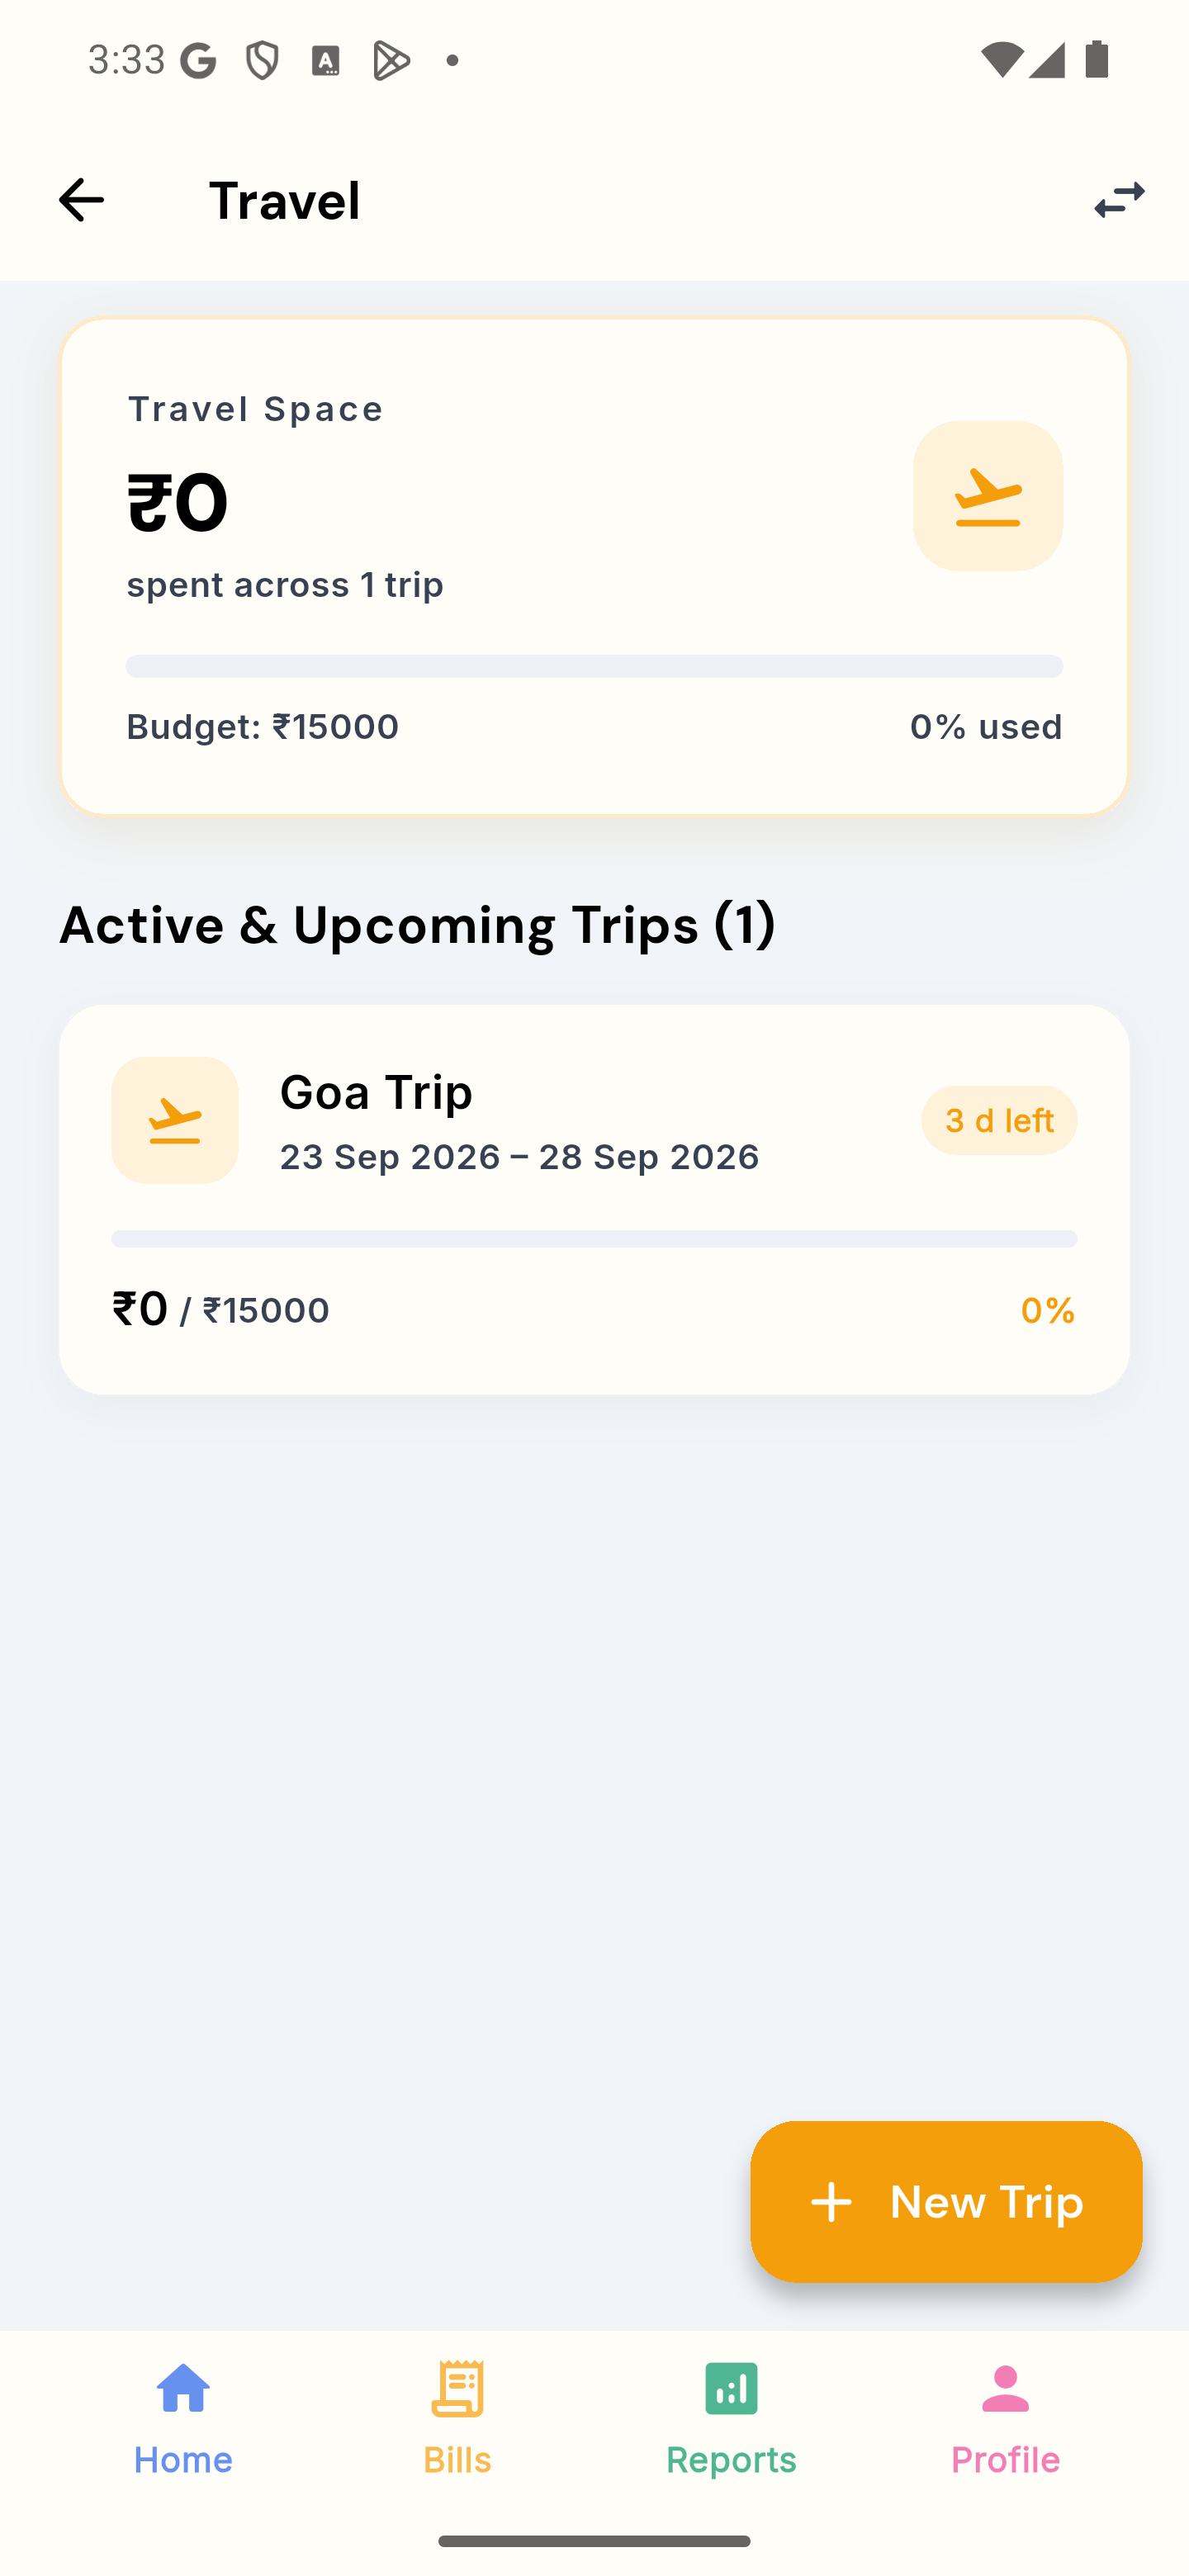
Travel Space tracks trip spending against a budget. Tap New Trip to open Plan New Trip: enter a Trip Name and a Trip Budget, pick the start and end dates, then tap Create Trip. The top card shows the total spent across all your trips against their combined budget, and each trip card shows spent against budget and the days left. Trips are listed under Active & Upcoming or Past & Archived. Tap a trip to see its budget ring (Spent, Total Budget and Remaining), a Daily Pace & Forecast card and its expenses, then tap Add Trip Expense to log a cost already tagged to that trip. You can also tag a trip from the main + form. The ⋮ menu on a trip lets you edit, archive or delete it; deleting a trip keeps its expenses. Trips are saved on your phone only and are not shared with Family Hub.

Travel Space with one trip: ₹0 spent across 1 trip against a ₹15000 budget (0% used), a Goa Trip card for 23 Sep 2026 – 28 Sep 2026 with 3 days left, and the New Trip button

Travel Space with one trip: ₹0 spent across 1 trip against a ₹15000 budget (0% used), a Goa Trip card for 23 Sep 2026 – 28 Sep 2026 with 3 days left, and the New Trip button

07

Portfolio — Asset Tracking

How to get there

  1. Open the app
  2. Tap the ☰ menu at the top-left
  3. Tap Portfolio
  4. Tap Add Asset at the bottom-right

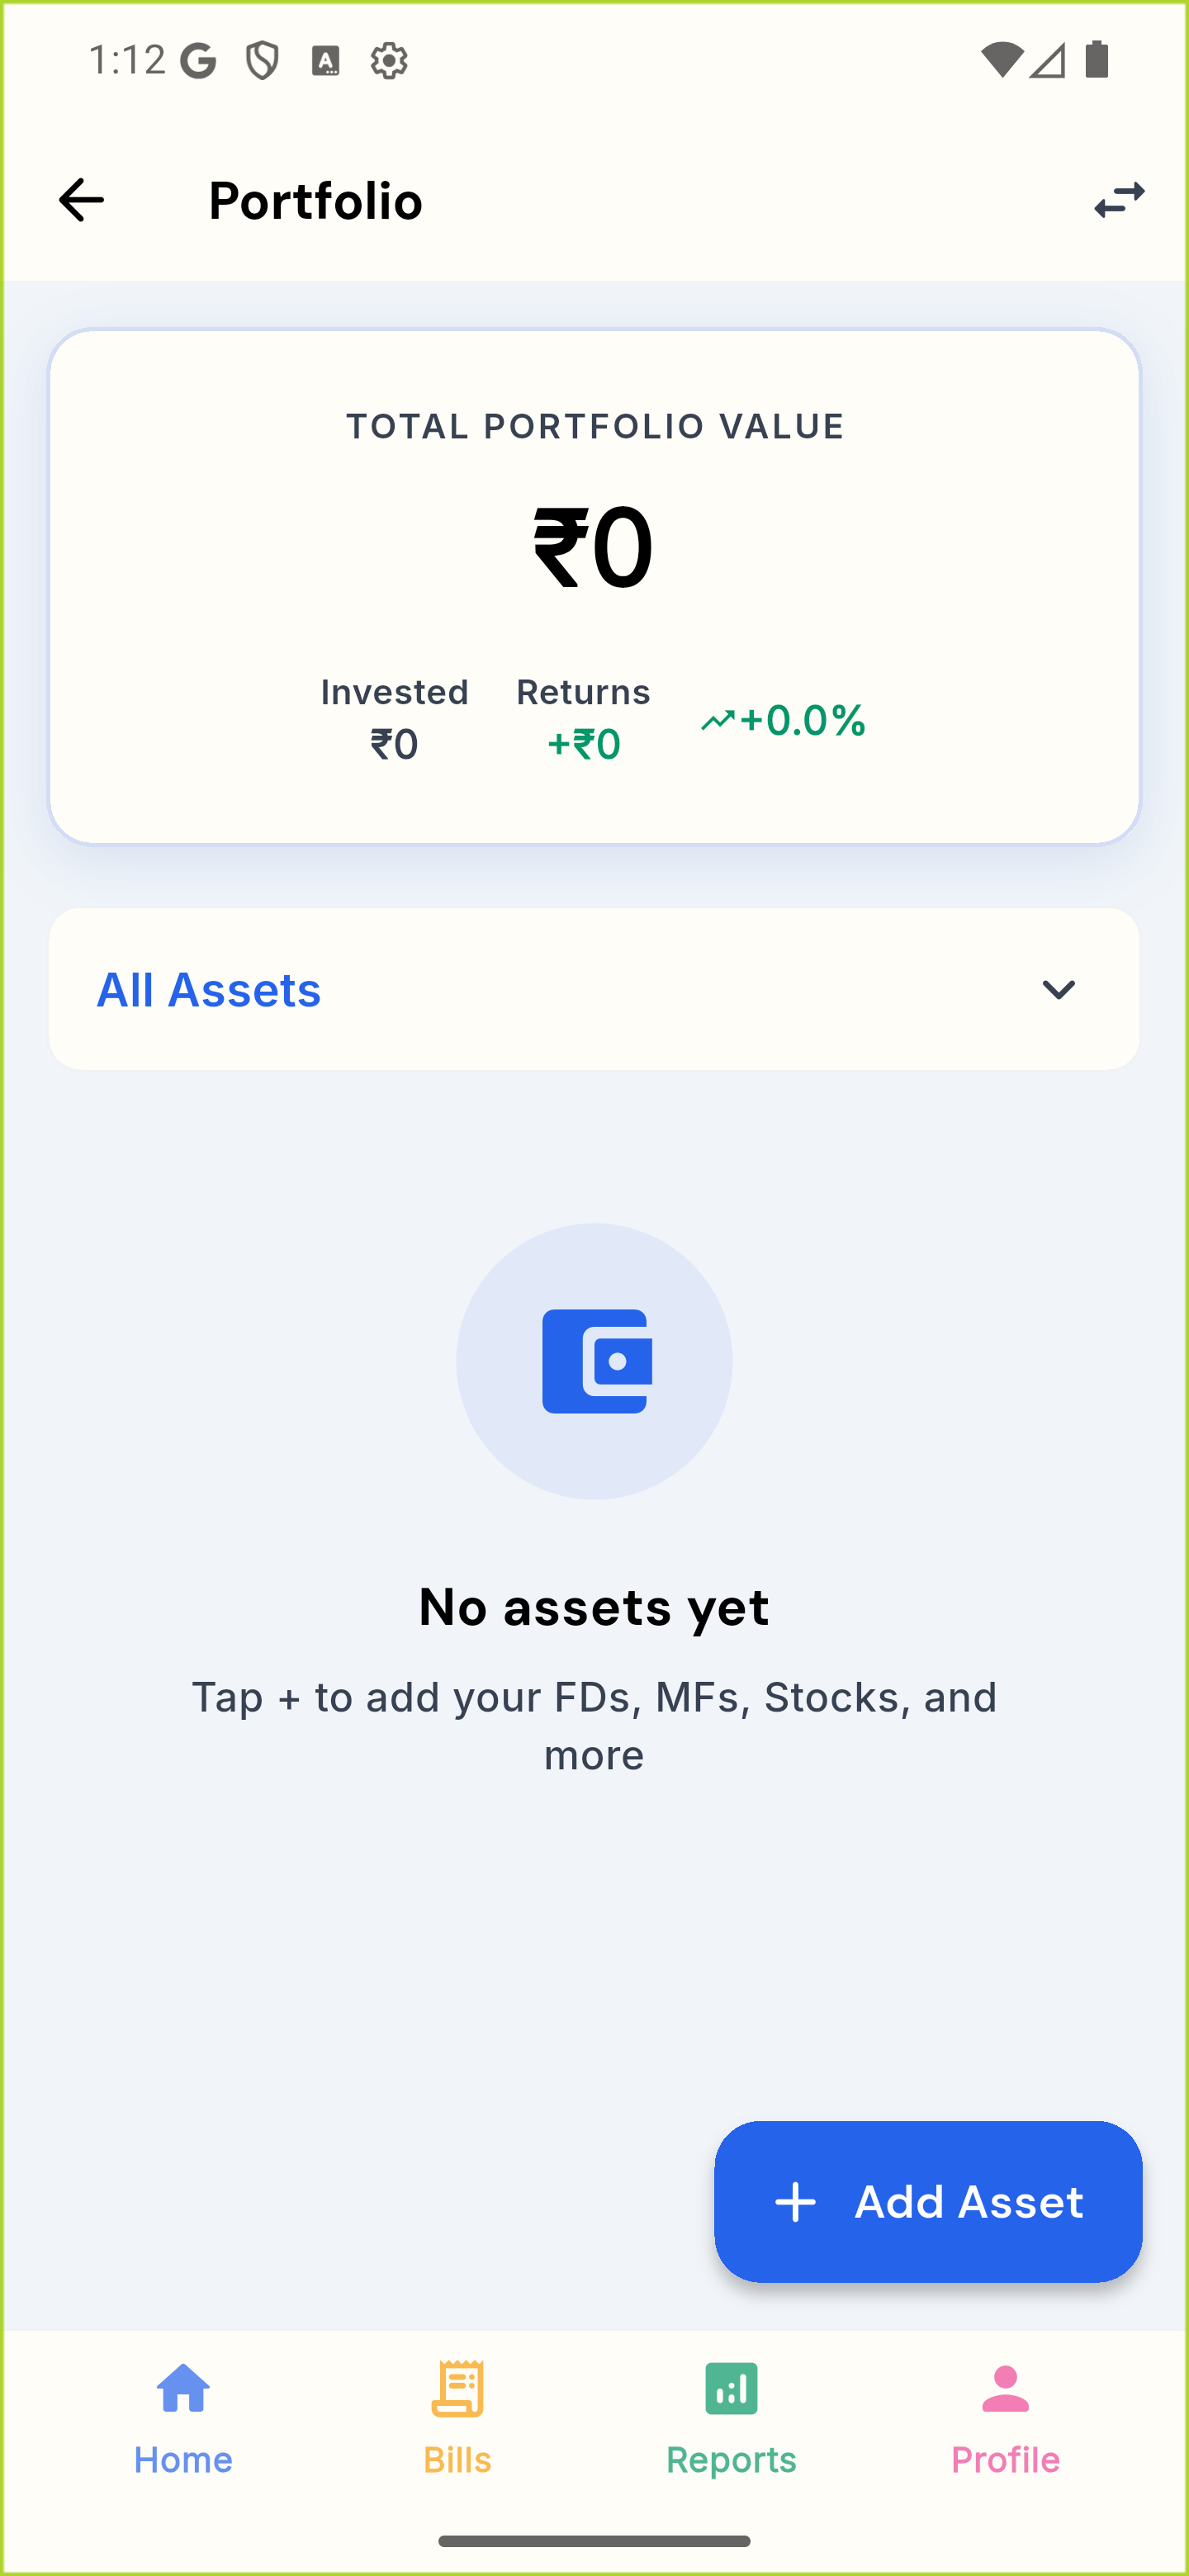
Portfolio opens with Total Portfolio Value plus Invested, Returns and % return. Below it, a dropdown filters the list by type (All Assets by default). Tap Add Asset and choose an asset type: FD, MF, Stock, Bond, Gold Bond, EPF, PPF, Gold, Crypto, Property or Other. If a filter is active, the button becomes Add FD, Add Stock and so on, and skips this choice. Fill in the name and institution and the fields for that type, such as folio or account number, units or shares, interest rate and maturity date. Then add the purchase price, Current Value, Purchase Date and optional notes. Assets are grouped by type, and each card shows its value and % return. Tap an asset for details, then use Update Value, Edit, or the delete icon (with a confirmation). You enter and update values yourself. Portfolio data stays on this phone and is not synced to the cloud.

Portfolio before any asset is added: Total Portfolio Value ₹0 with Invested and Returns, the All Assets filter, the “No assets yet” message and the Add Asset button

Portfolio before any asset is added: Total Portfolio Value ₹0 with Invested and Returns, the All Assets filter, the “No assets yet” message and the Add Asset button

08

Udhaar — Lending & Borrowing Ledger

How to get there

  1. Open the app
  2. Tap Profile in the bottom bar
  3. Scroll down and tap Udhaar Ledger
  4. Tap Request New Udhaar (under ACTIONS)

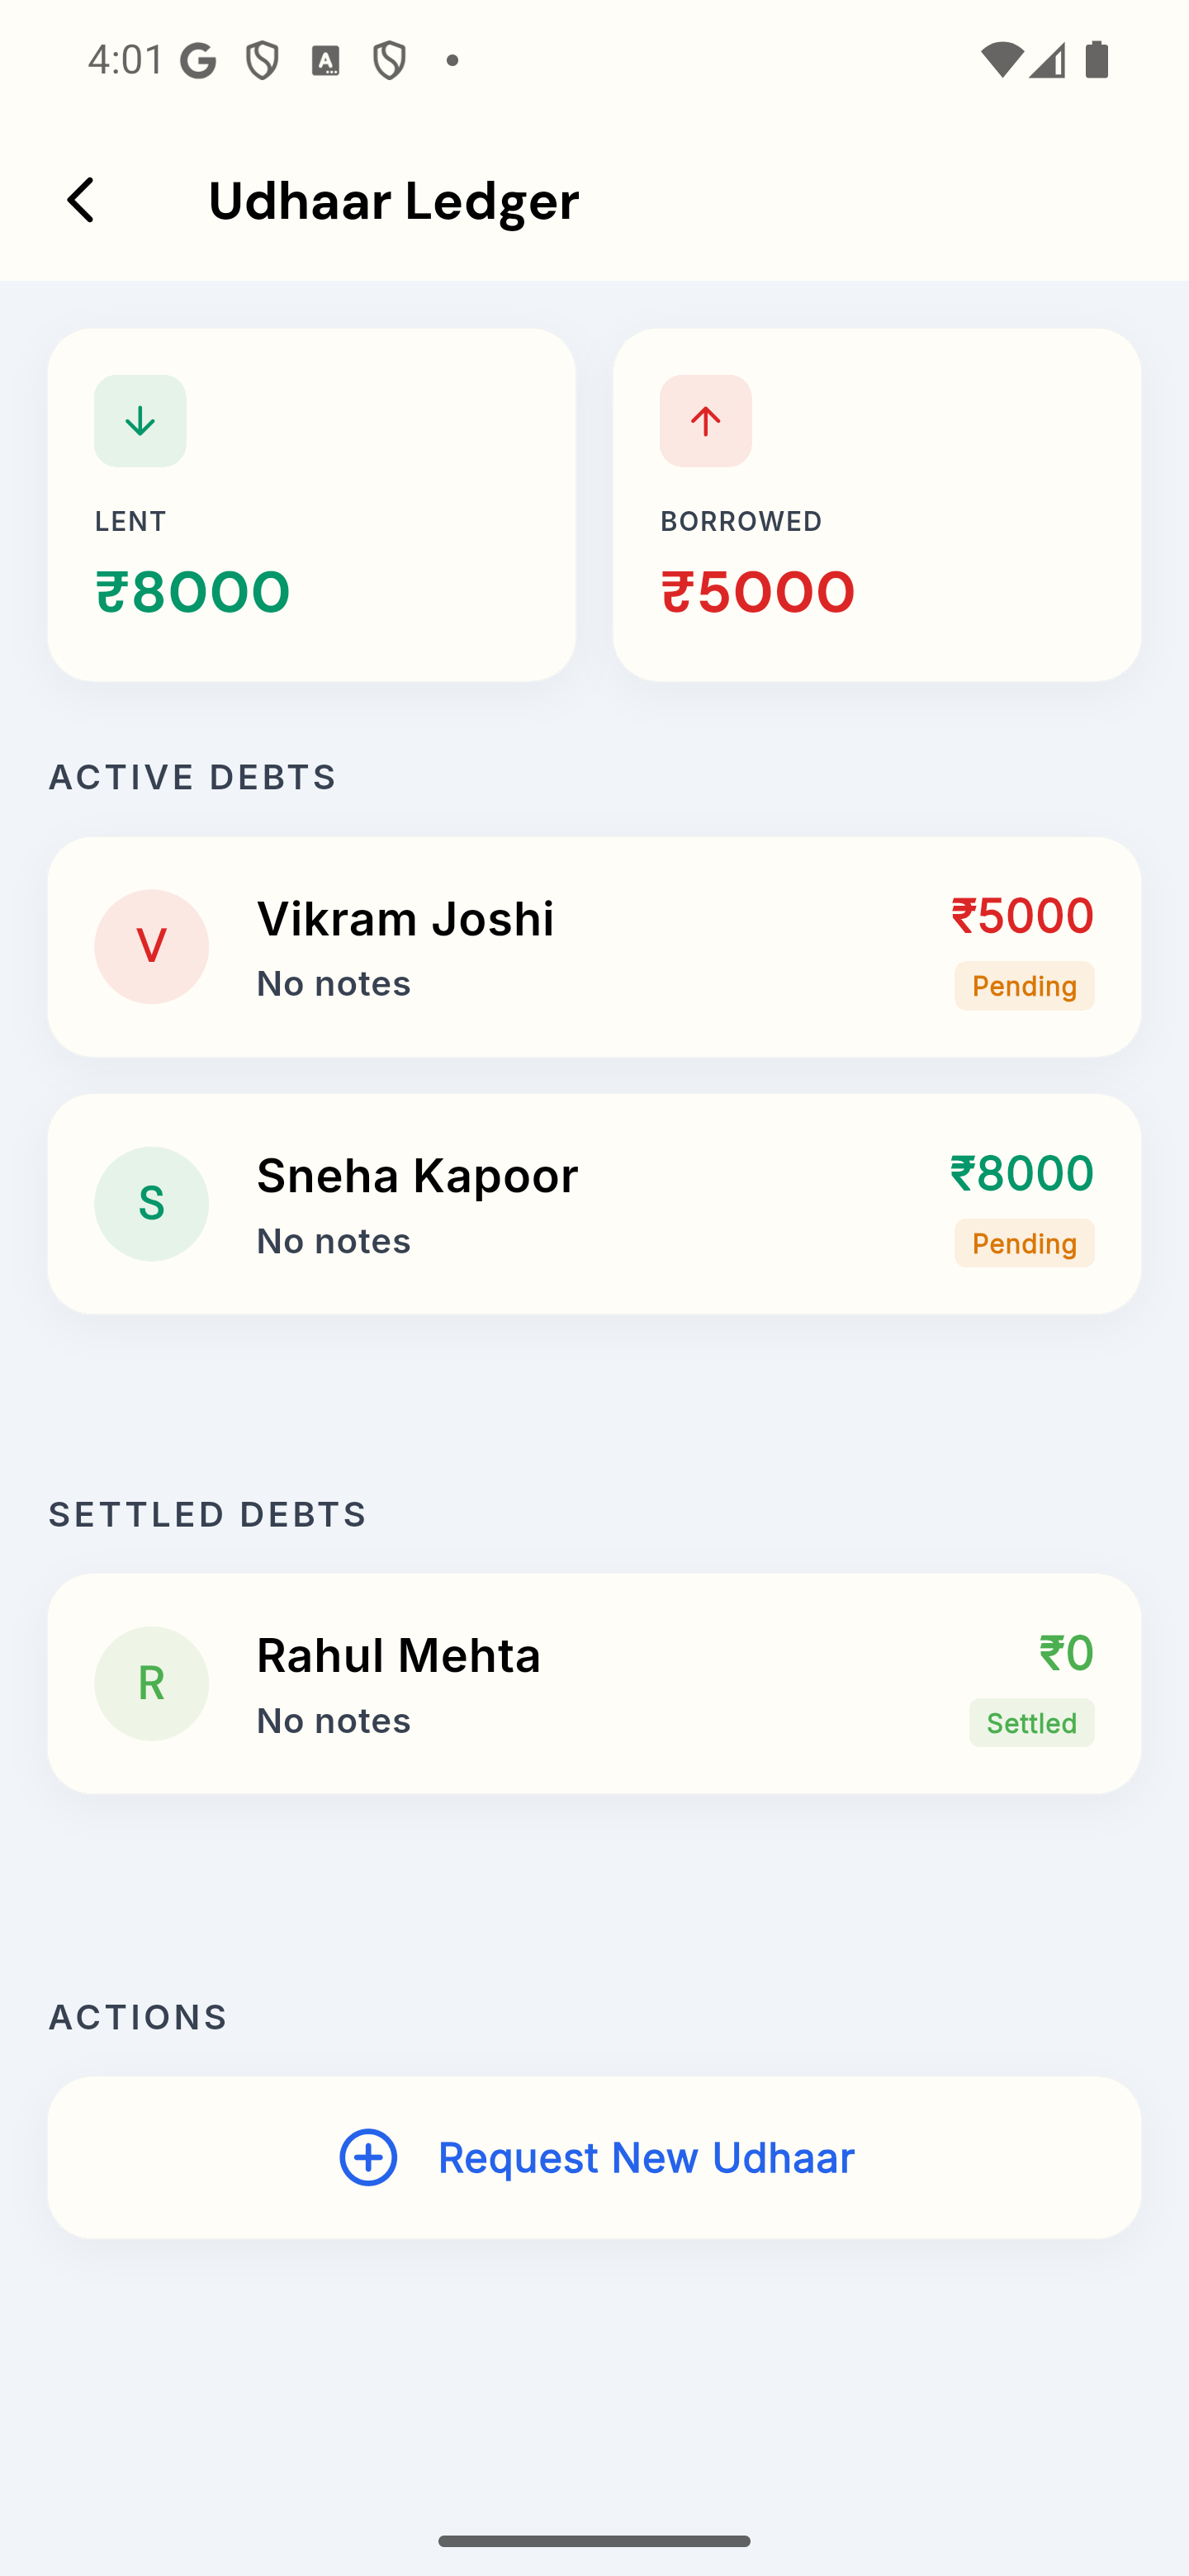
Udhaar Ledger shows your Lent (owed to you) and Borrowed (you owe) totals, then Active Debts and Settled Debts. Tap Request New Udhaar, choose Lent or Borrowed, and enter the person's name and the amount. Phone number, email, note and due date are optional. Tap Add Debt Request. If you enter the email address the other person uses for their Rupix account, they see your request under Pending Approval Requests and can approve or decline it. Without that email, the entry is saved for you only. Tap any entry to see its payment history and record a repayment; a repayment can wait for the other person to confirm it. Past-due entries show Overdue. Udhaar entries are stored on Rupix servers, so this feature needs internet.

Udhaar Ledger with demo entries: Lent ₹8000 and Borrowed ₹5000 totals, two pending active debts, one settled debt, and the Request New Udhaar action

Udhaar Ledger with demo entries: Lent ₹8000 and Borrowed ₹5000 totals, two pending active debts, one settled debt, and the Request New Udhaar action

09

Auto-track — Bank/UPI Alerts to Entries

How to get there

  1. Open the app
  2. Tap Profile in the bottom bar
  3. Scroll down and tap Auto-track spends
  4. Tap Turn on auto-track, then allow notification access for Budget & Expense Tracker in Android Settings
  5. Press back to return to the app; your review list appears on this screen

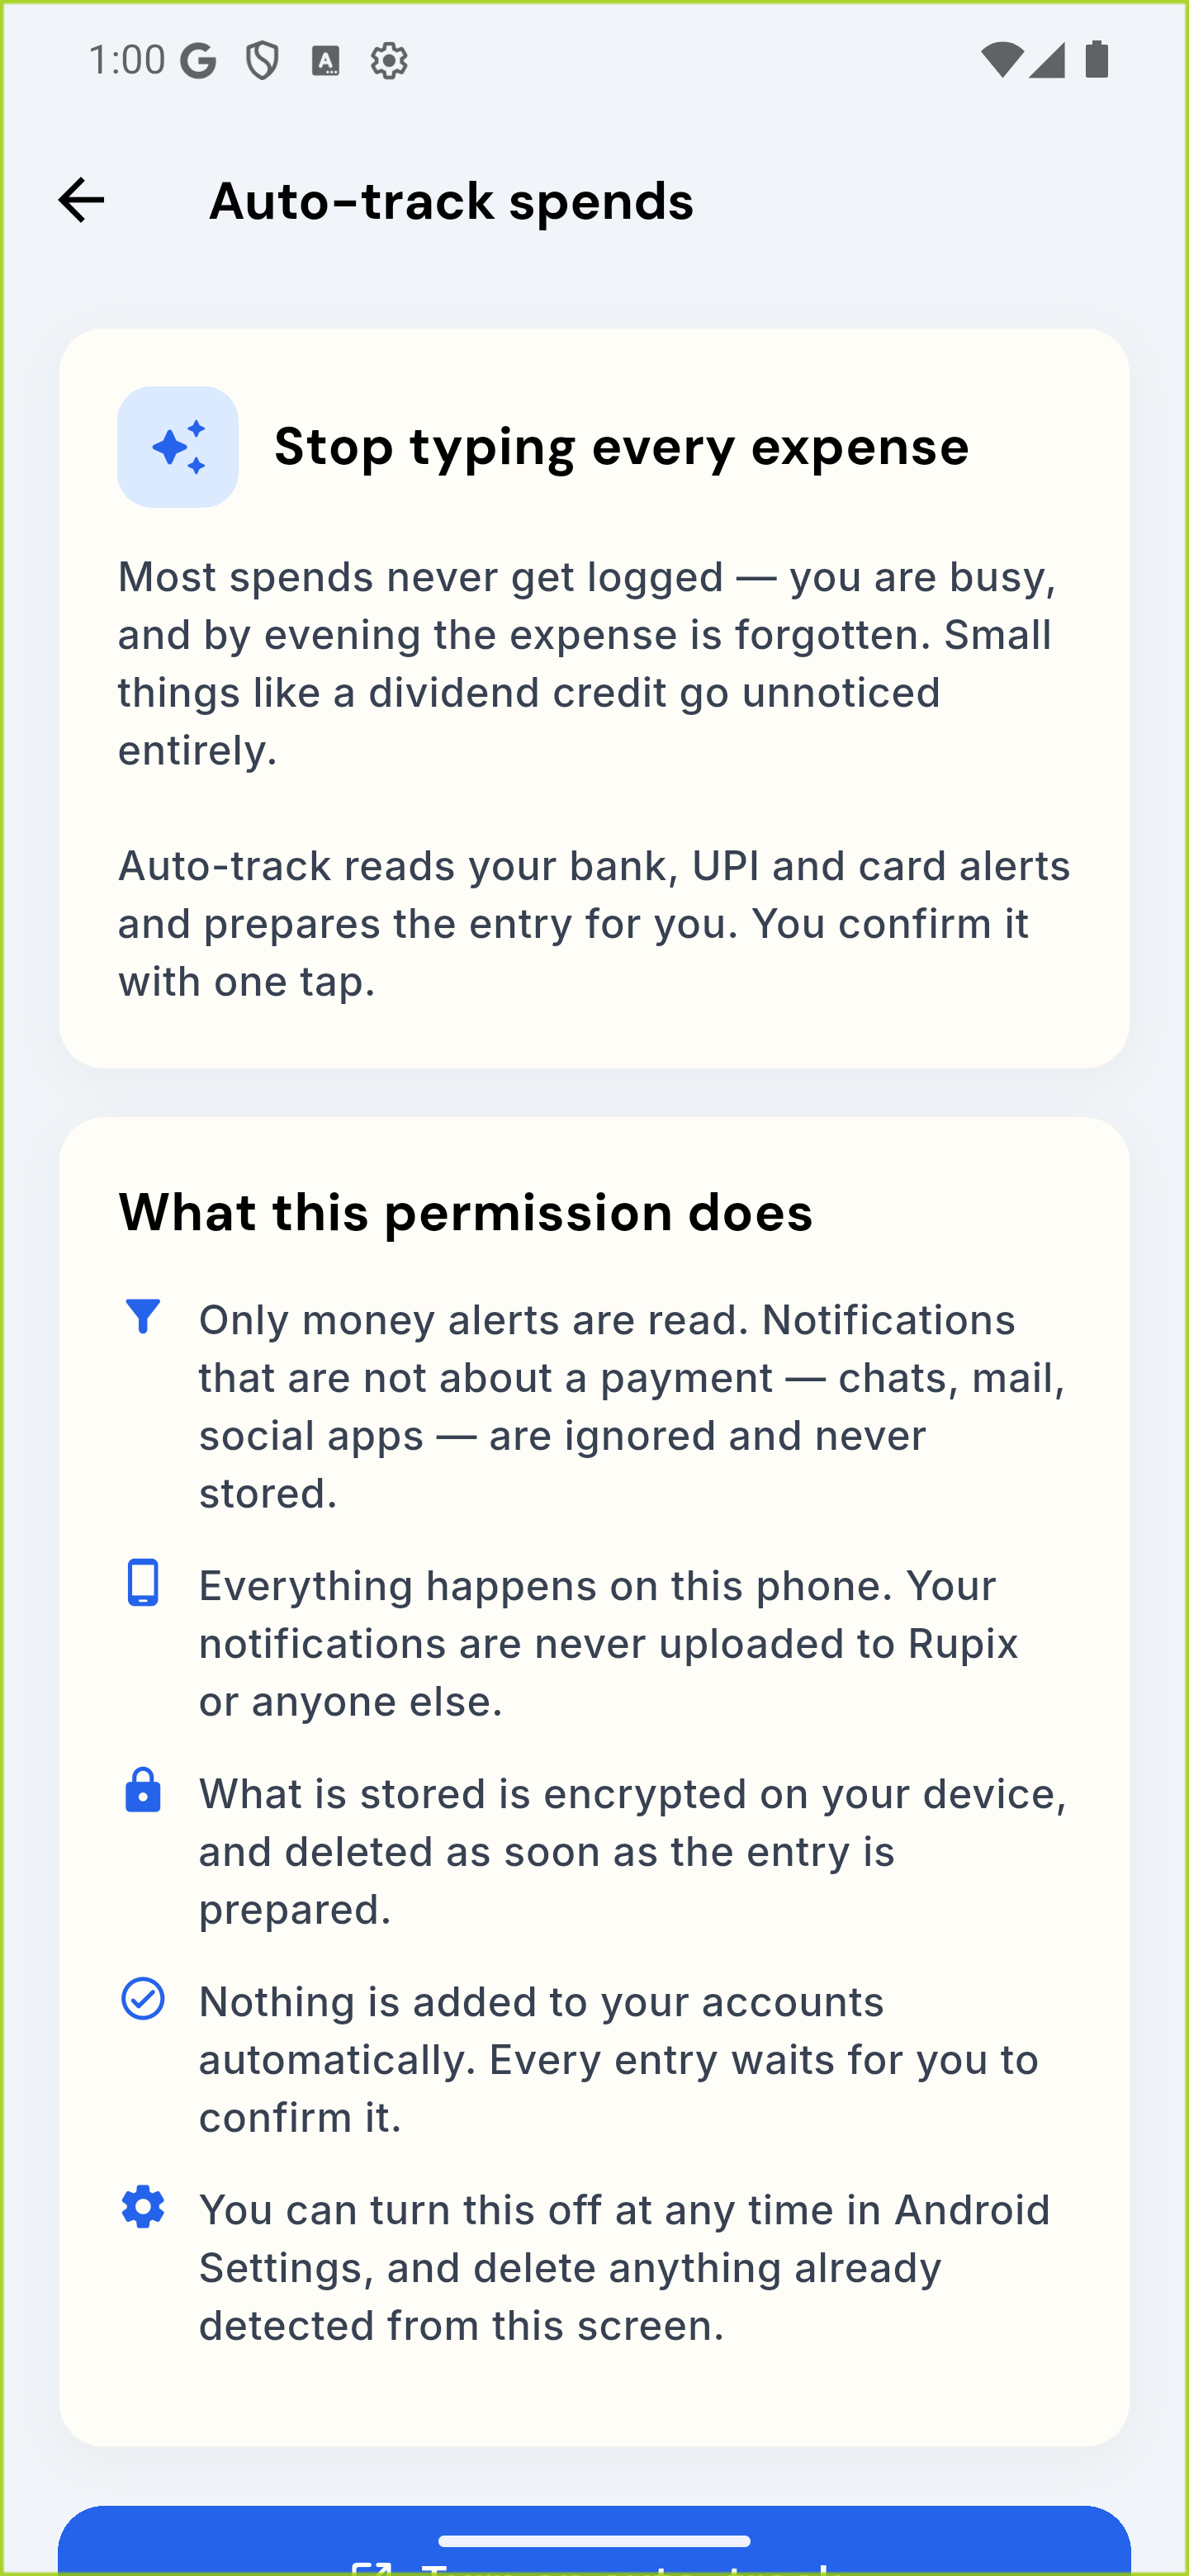
Before any permission is requested, the screen explains what auto-track does: only money alerts are read, while chats, mail and social notifications are ignored; alerts are processed on your phone and not uploaded; stored alerts are encrypted and deleted once the entry is prepared; and nothing is added without your confirmation. Tap Turn on auto-track to open Android's notification-access page and allow Budget & Expense Tracker. Back in the app, the screen says auto-track is on. New bank, UPI and card alerts, both debits and credits, appear as ready-made entries showing category, payment mode, time and amount. Tap Add to my ledger to save one, Ignore to drop it, or Clear all. Pull down to refresh. You can switch it off at any time in Android Settings. On phones that cannot store alerts securely, the button is disabled and the screen says auto-track is unavailable.

Auto-track spends explanation screen, shown before any permission is asked: “Stop typing every expense” and “What this permission does” with five points

Auto-track spends explanation screen, shown before any permission is asked: “Stop typing every expense” and “What this permission does” with five points

10

Reports & Spending Charts

How to get there

  1. Open the app
  2. Tap Reports in the bottom bar

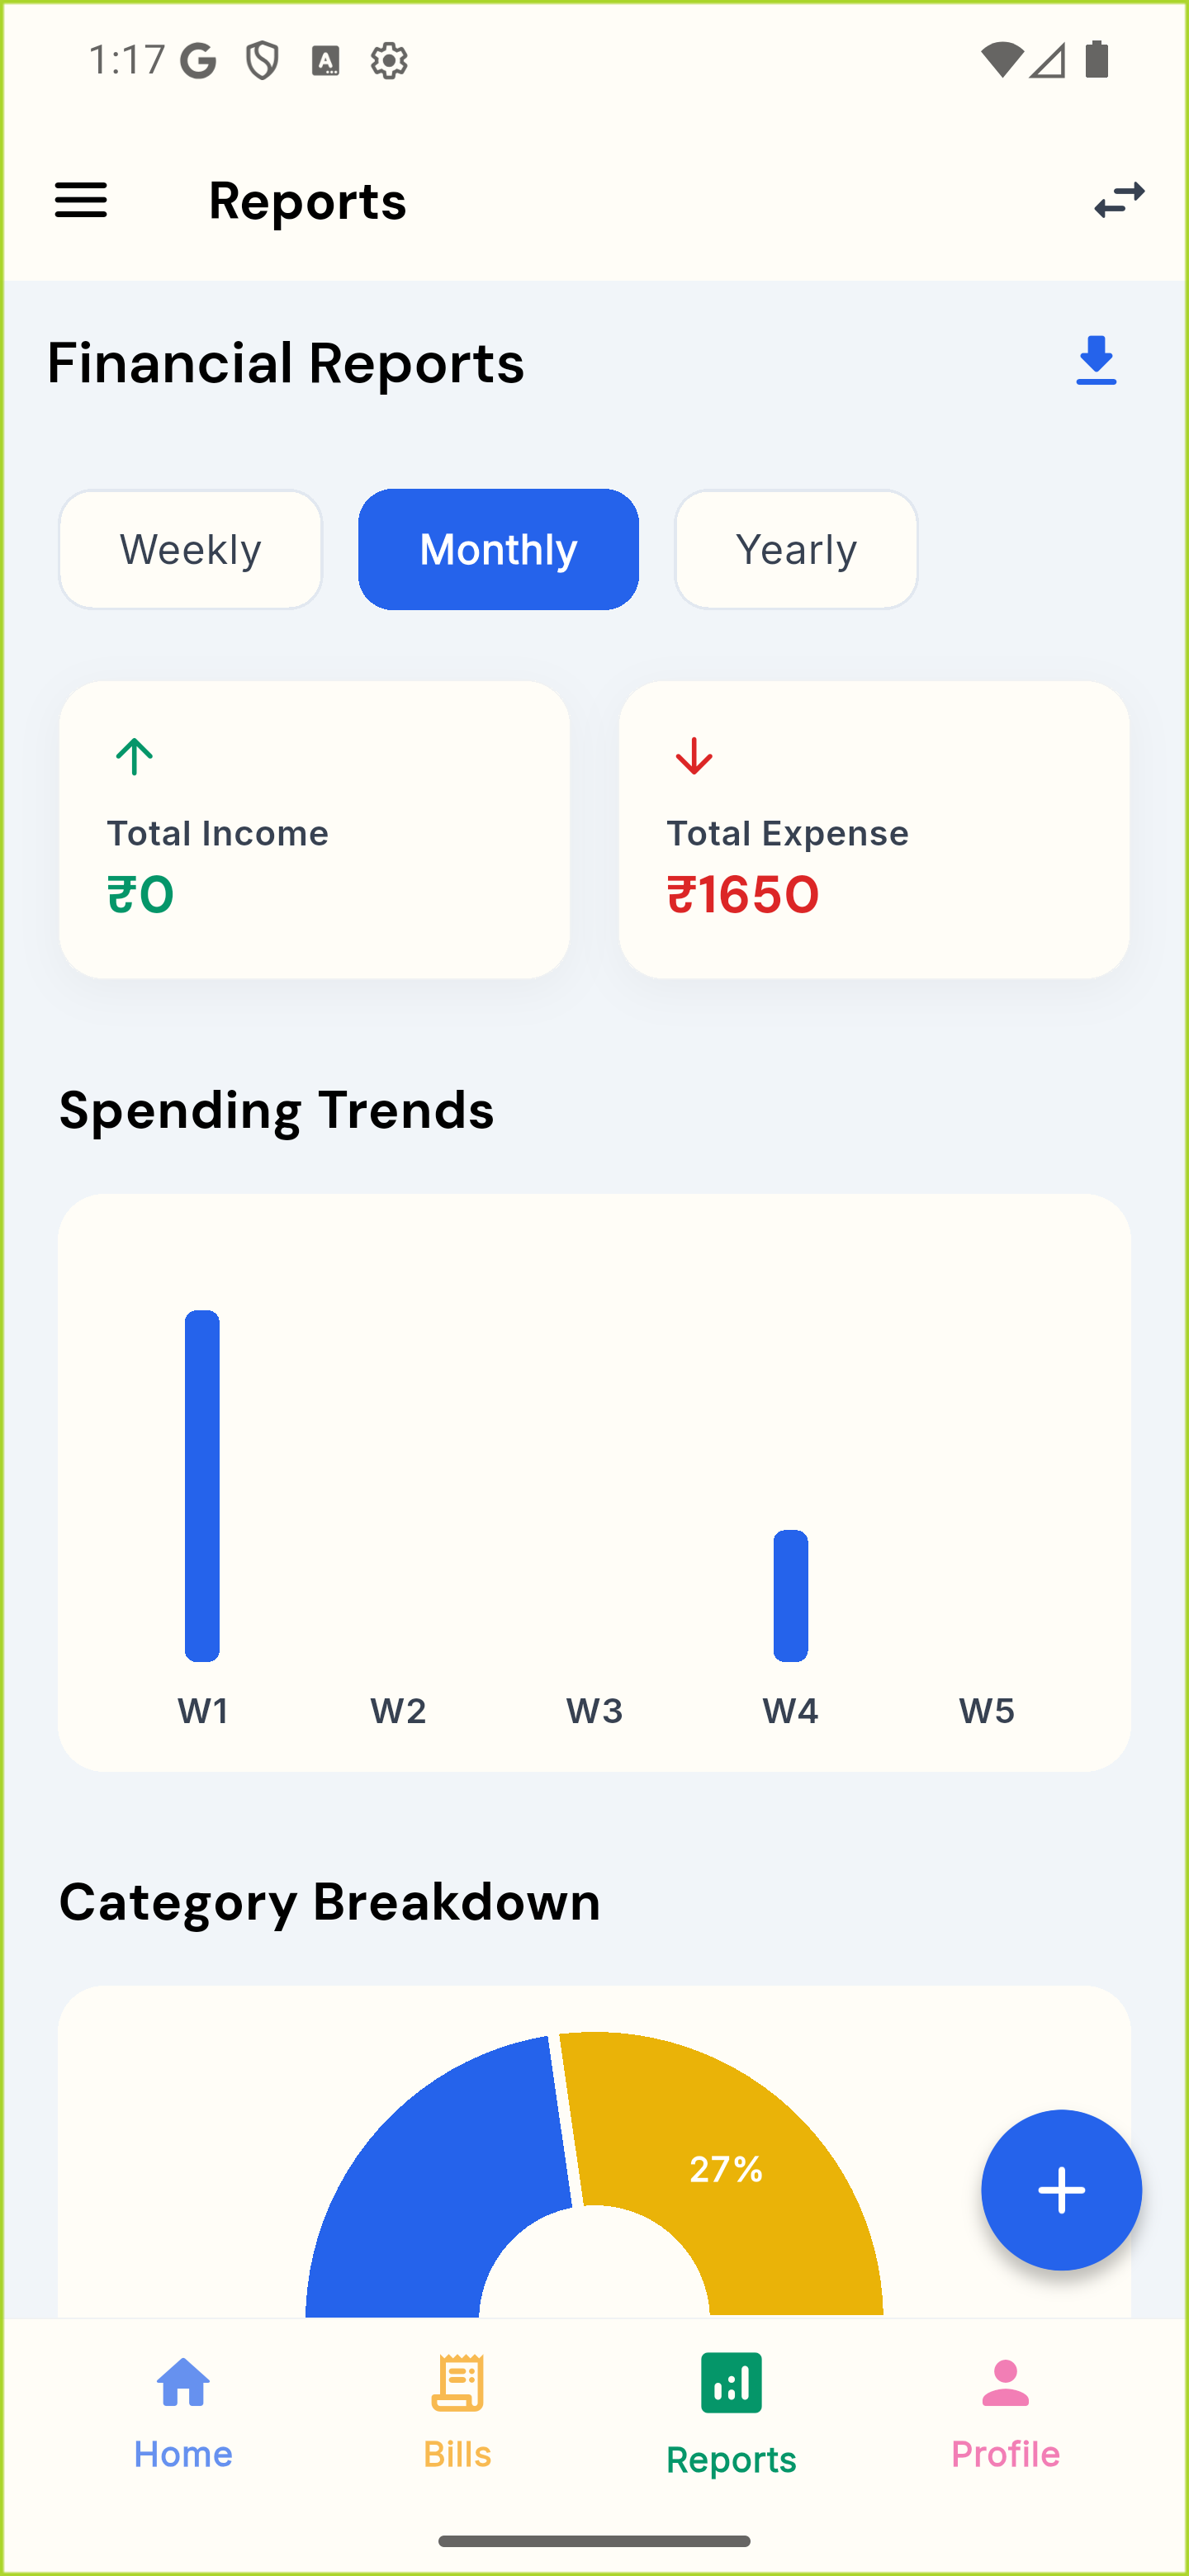
The Reports tab, headed Financial Reports, has Weekly, Monthly and Yearly buttons, with Monthly selected by default. Weekly covers the last 7 days, Monthly the current calendar month and Yearly the current calendar year. For the chosen period you see Total Income and Total Expense cards, a Spending Trends bar chart of expenses (by day, by week of the month, or by month) and a Category Breakdown donut with a legend listing each category's amount and share, largest first. The download icon at the top-right creates a CSV file of every transaction in your current space, not just the selected period, and opens Android's share sheet so you can save or send it. Quick stats such as daily average, month-end forecast, top spending category and number of entries are on the Home tab under Analytical Pulse.

Financial Reports with Weekly, Monthly and Yearly buttons (Monthly selected), Total Income ₹0 and Total Expense ₹1650 cards, the Spending Trends bar chart by week, and the top of the Category Breakdown chart

Financial Reports with Weekly, Monthly and Yearly buttons (Monthly selected), Total Income ₹0 and Total Expense ₹1650 cards, the Spending Trends bar chart by week, and the top of the Category Breakdown chart

11

Money Coach — Why Is My Spending High?

How to get there

  1. Open the app
  2. Tap the ☰ menu at the top-left of Home
  3. Tap Money Coach
  4. Optional: tap Download on-device AI on the card to get a plain-language version of the summary

Money Coach compares this month with the same days last month and explains, in English or Hinglish, why your spending is higher or your savings are lower, followed by three practical steps. Below the summary are the numbers behind it: spending so far, savings, top categories, budgets and fixed monthly costs. Every figure is calculated by the app from your own entries, so it needs a few entries first. The on-device model is optional: it is a one-time download (about 300 MB) that runs entirely on your phone, and it may only re-word the summary. If its wording fails the app's accuracy checks, the rule-based summary is shown instead. A summary written by the model is labelled On-device AI and has a Report button. Money Coach is not investment or loan advice.

12

Ask Coach — Chat About Your Money

How to get there

  1. Open the app
  2. Tap the ☰ menu at the top-left of Home
  3. Tap Ask Coach (Chat), or tap Ask Coach a question inside Money Coach
  4. Type a question, or tap a suggestion such as Why is my spending high?

Ask Coach lets you chat about your own money in English or Hinglish, for example "Is mahine kitna kharcha hua?", "How much went on Food?", "Compare with last month", "How are my budgets doing?" or "Bachat kaise badhaun?". The app answers these from your entries, so the figures are exact. Other questions go to the optional on-device model: it runs on your phone, never sends your question anywhere, and its replies are labelled On-device AI with a Report button. If the model is not downloaded, or its reply fails the app's checks, the coach tells you which questions it can answer instead. It does not give investment, loan or insurance advice, and the conversation is not saved: it is cleared when you close the screen.

13

Scan Receipt

How to get there

  1. Open the app
  2. Tap the ☰ menu at the top-left of Home
  3. Tap Scan Receipt (AI)
  4. Tap Camera or Gallery and pick a clear photo of the bill
  5. Check the Extracted Details, fix anything that is wrong, then tap Review & Save to Expenses

Scan Receipt reads a photo of a bill on your phone and fills in the shop name, total amount, date, category and payment mode for you to check. Text recognition runs on the device and works without any download. Turn on the On-device AI switch (and download the model once) to let the on-device model double-check those fields; the label under the details tells you honestly whether the values came from text rules, were checked by the model, or were changed by it. Always review the amount before saving. The photo is not uploaded.

14

Family Hub — Shared Household Budgeting

How to get there

  1. Open the app
  2. Tap Profile in the bottom bar
  3. Tap Family Hub
  4. Turn on the switch at the top so it reads Cloud Mode (it starts in Local Mode)
  5. Tap Create Family Hub or Join via Invite Code, or tap Accept on an invite under INVITES RECEIVED

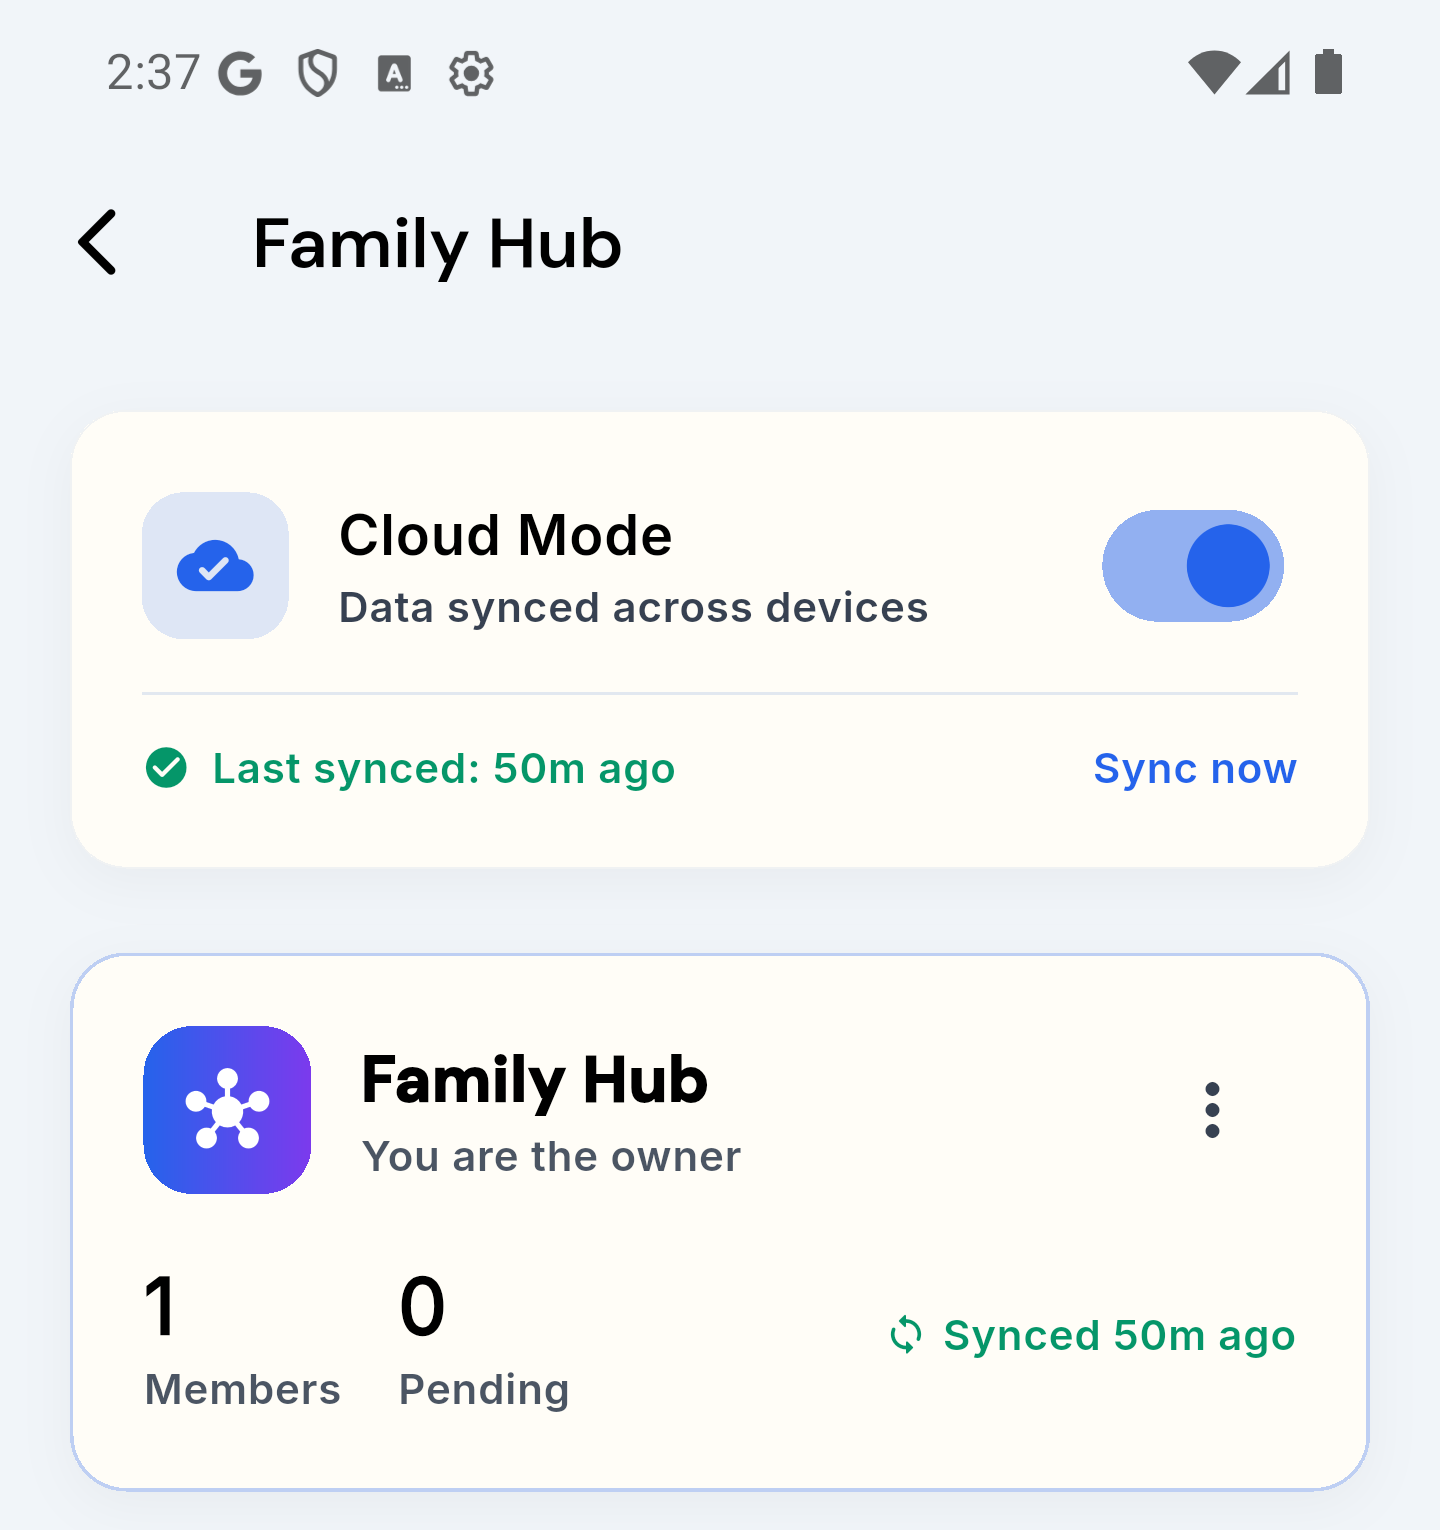
Family Hub starts in Local Mode, where your data stays on this phone. Turn the switch on to use Cloud Mode. The first time, your existing entries upload to Rupix servers, with a progress bar. Only then do Create Family Hub, Join via Invite Code and Invites Received appear. Every member needs their own Rupix account. As the owner, tap Invite, enter the member's email, a display name and a relationship role, then tap Send Invite. No email or link is sent. The member sees the invite under Invites Received when they sign in with that email, or you can copy the invite code from Pending Invites and share it yourself. Members share transactions, accounts, budgets, goals and recurring items. Portfolio assets and trips are not shared. Changes are not live: pull down on Home to fetch the latest entries. On Rupix servers, amounts, dates and entry types are stored in readable form. Descriptions, categories and payment modes are encrypted only if your hub has a family key. Creating a hub makes one on the owner's phone, and each member adds it with Import Key by scanning the owner's QR code or pasting it.

Family Hub with Cloud Mode switched on (“Data synced across devices”, last synced 50m ago, Sync now) and a hub card showing “You are the owner”, 1 member and 0 pending invites

Family Hub with Cloud Mode switched on (“Data synced across devices”, last synced 50m ago, Sync now) and a hub card showing “You are the owner”, 1 member and 0 pending invites

15

Privacy & Safety — App Lock

How to get there

  1. Open the app
  2. Tap Profile in the bottom bar
  3. Scroll down and tap Privacy & Safety
  4. Tap Setup next to App PIN Lock and create a 4-digit PIN
  5. Optional: turn on Biometric Unlock

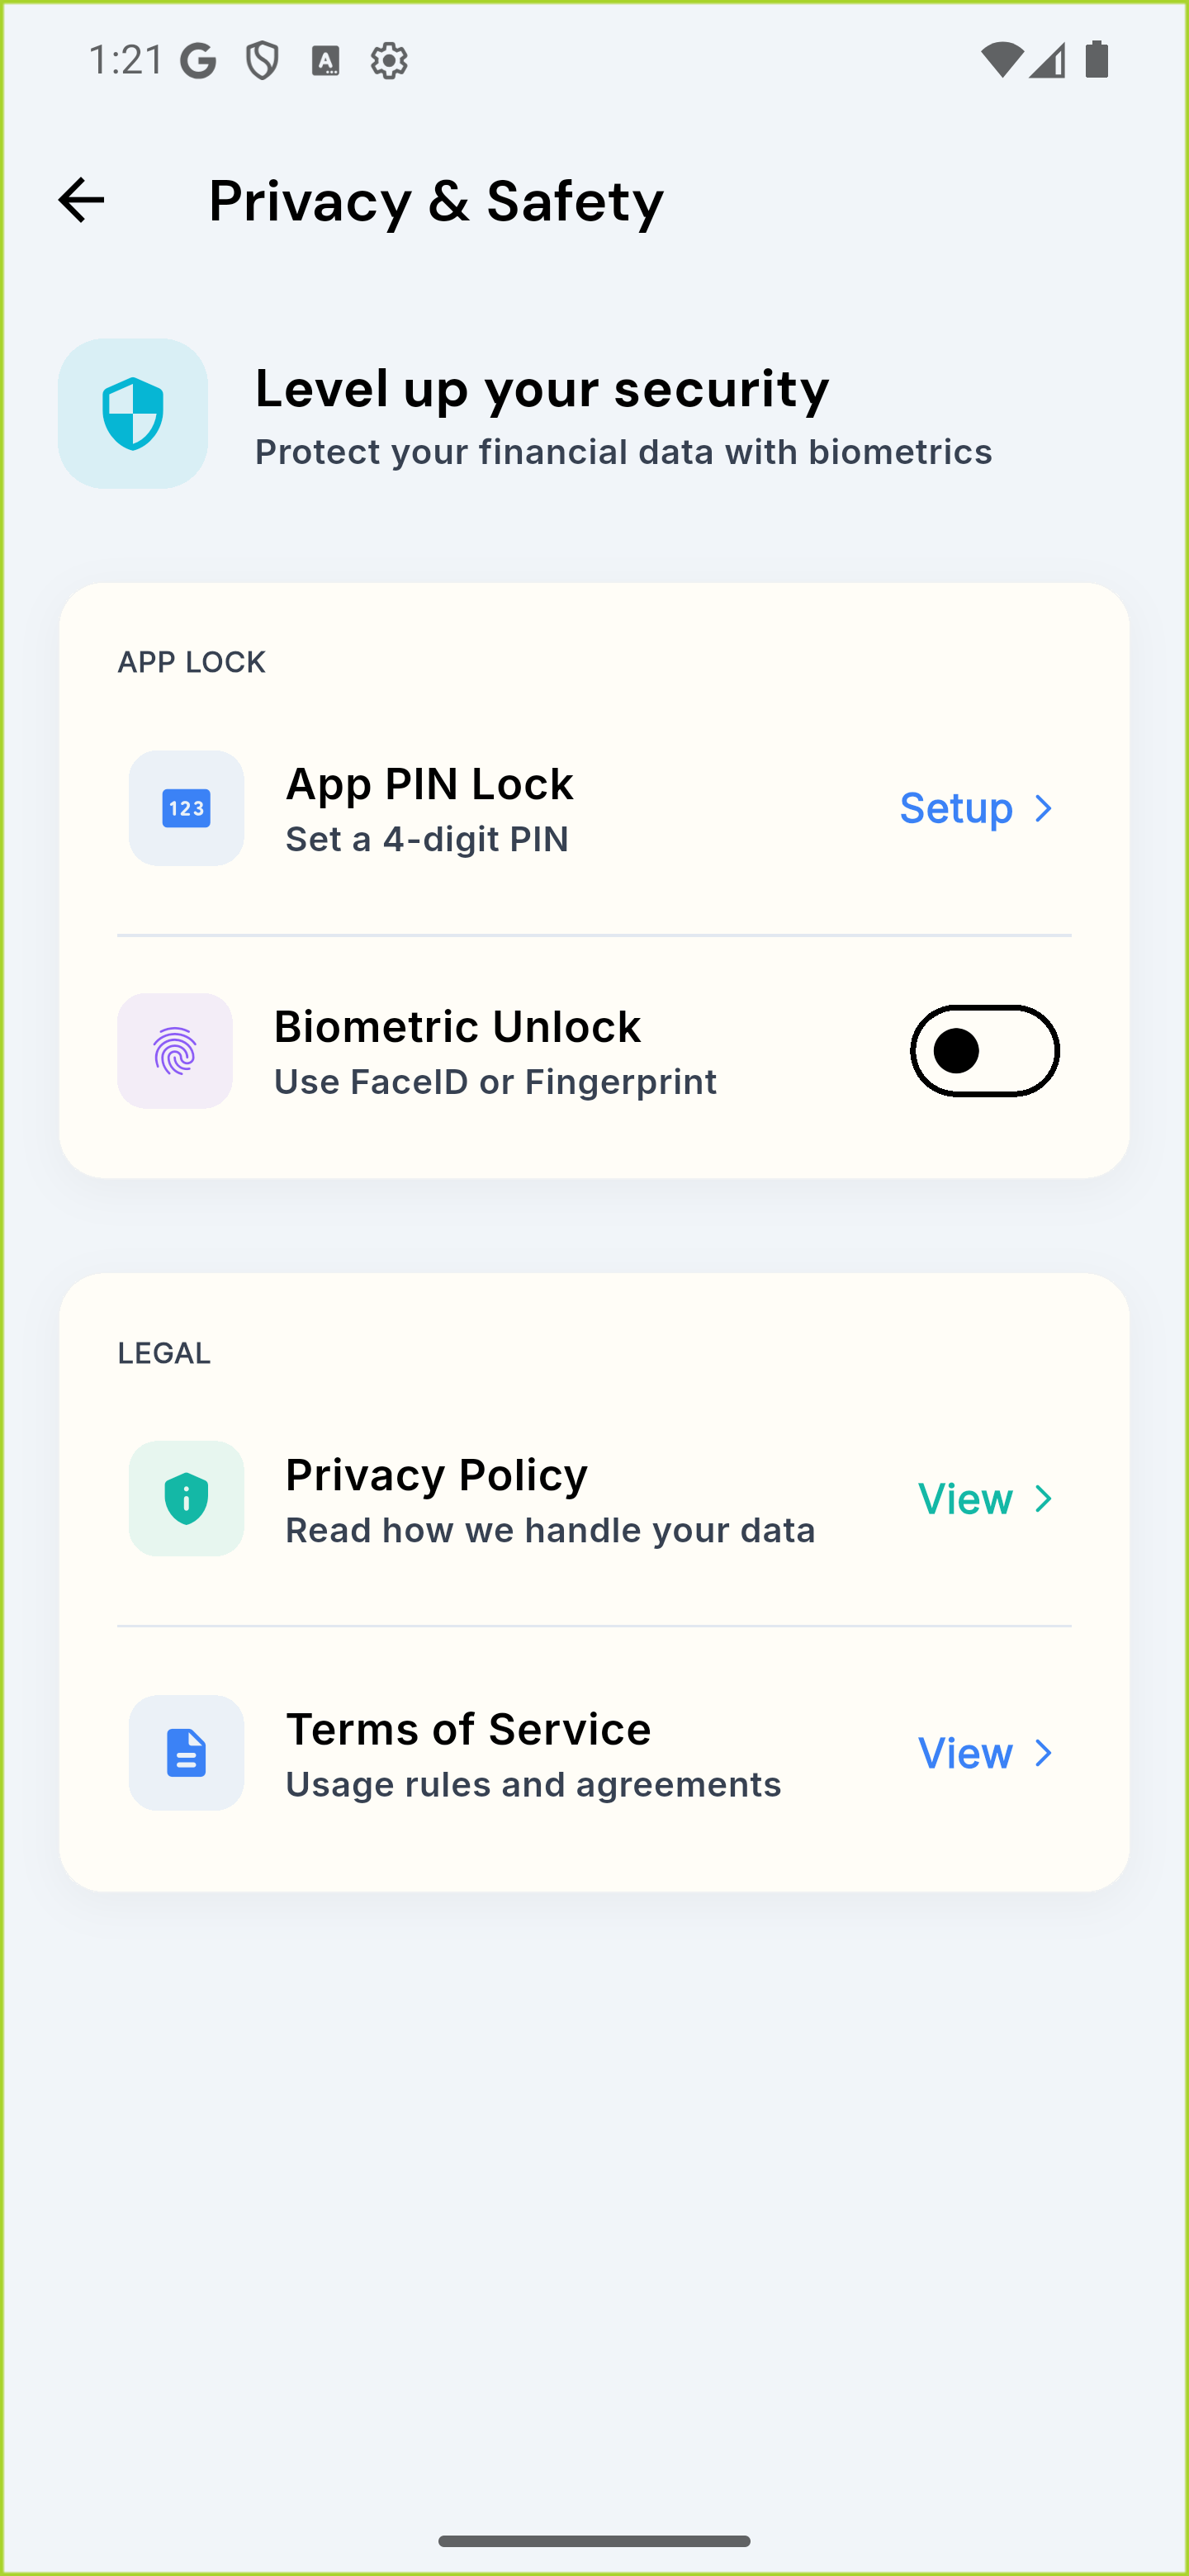
Privacy & Safety has two sections. Under App Lock, tap Setup next to App PIN Lock to create a 4-digit PIN. Once it is set, the app locks whenever you leave it and asks for the PIN when you return. Biometric Unlock (fingerprint or face) can be turned on only after a PIN exists, and the PIN stays as the fallback. Under Legal, View opens the Privacy Policy and the Terms of Service. On your phone, the app keeps your data in an encrypted database. Android cloud backup is off for this app, so uninstalling removes the copy on your phone. Transactions, budgets, goals and recurring items stay on the phone unless you turn on Cloud Mode in Family Hub; portfolio assets and trips are never synced. Udhaar entries are always stored on Rupix servers. To keep your own copy of your transactions, use the download icon on the Reports tab. To delete your account, tap Delete my account at the bottom of the Profile tab (details at rupix.io/delete-account).

Privacy & Safety with an App Lock section (App PIN Lock with Setup, and a Biometric Unlock switch) and a Legal section (Privacy Policy and Terms of Service)

Privacy & Safety with an App Lock section (App PIN Lock with Setup, and a Biometric Unlock switch) and a Legal section (Privacy Policy and Terms of Service)

16

Profile & Settings

How to get there

  1. Open the app
  2. Tap Profile in the bottom bar (the right-most icon)
  3. Scroll down to see every row

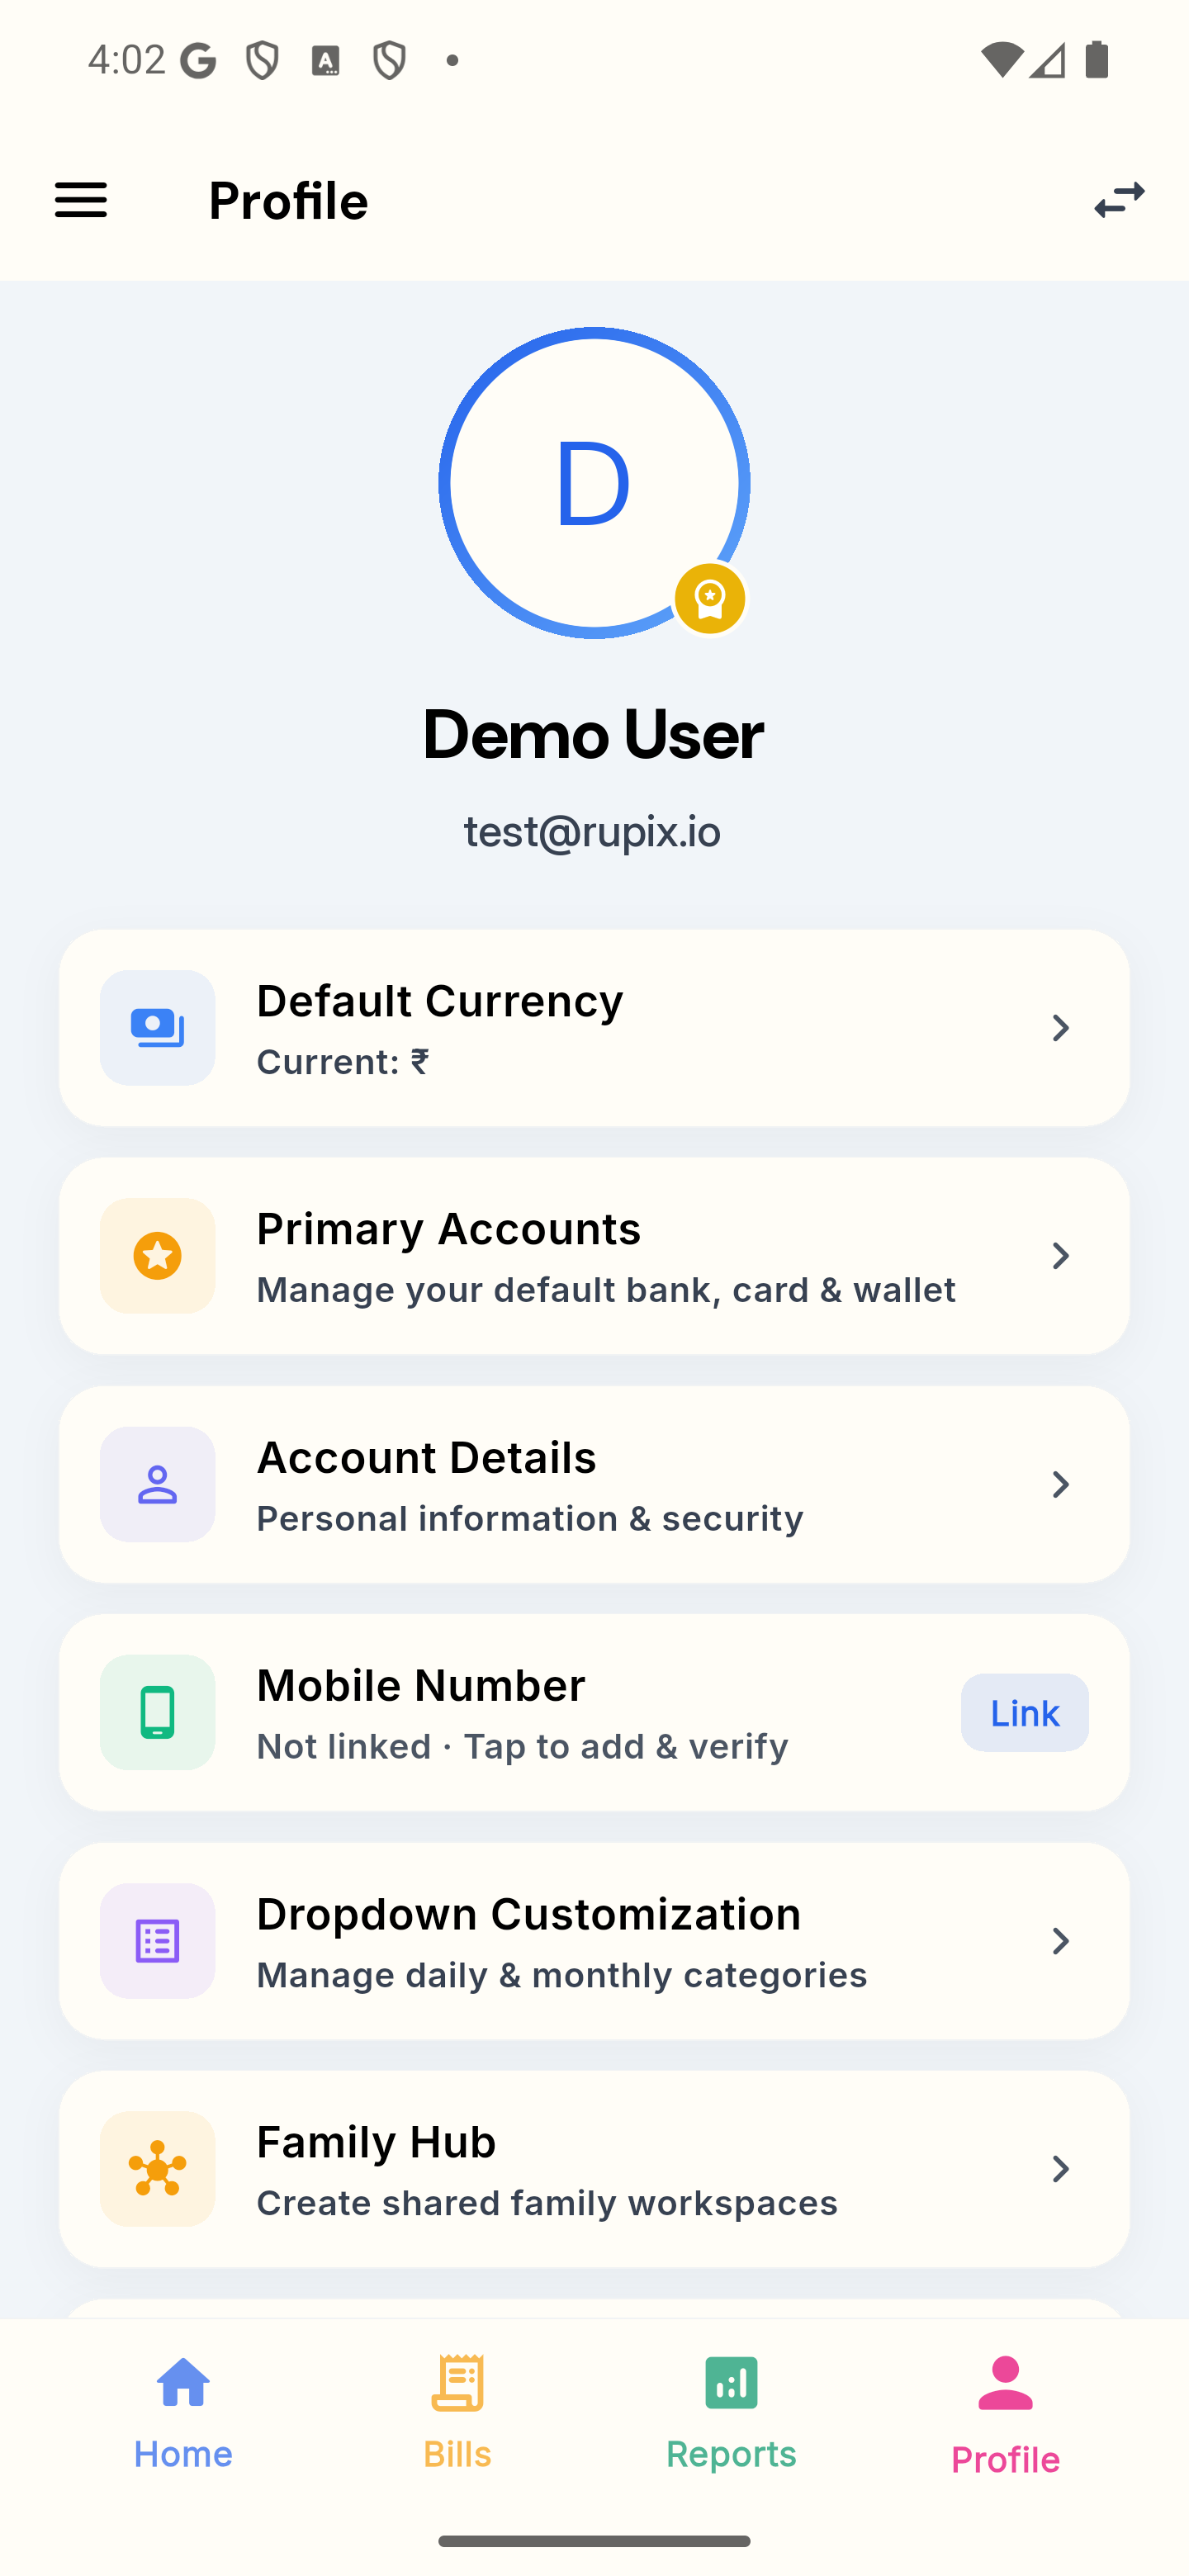
The Profile tab is the settings screen: your photo, name and email, followed by a list of rows. Tapping the photo only lets you pick a new picture from your gallery. Default Currency offers 20 currencies, although amounts across the app are still shown in ₹. Primary Accounts sets the default Bank/UPI, Credit Card and Wallet account that Add Expense pre-selects. Account Details shows your name, email and phone number. The Mobile Number row is for linking a phone by SMS code, which is not working yet. Dropdown Customization edits your daily and monthly categories, income streams, payment modes and budget groups. Further down are Family Hub, Udhaar Ledger, Auto-track spends, Notifications, Privacy & Safety, Sign Out and Delete my account. Money Coach, Ask Coach, Wallet, Portfolio, Budgets, Recurring, Savings Goals, Financial Profile, EMI Calculator, Travel and Scan Receipt are in the ☰ menu instead.

Profile tab for “Demo User” (test@rupix.io) with rows for Default Currency, Primary Accounts, Account Details, Mobile Number (not linked), Dropdown Customization and Family Hub; more rows appear when you scroll

Profile tab for “Demo User” (test@rupix.io) with rows for Default Currency, Primary Accounts, Account Details, Mobile Number (not linked), Dropdown Customization and Family Hub; more rows appear when you scroll

Privacy is the foundation

Your entries stay on your phone by default, in an encrypted database. Your financial entries are not uploaded unless you turn on Family Hub Cloud Mode or use Udhaar, and the app never asks for your bank login. (The app does send crash reports and app usage analytics.) If you turn on Family Hub Cloud Mode, your entries sync through Rupix servers. Step 14 explains exactly what is stored and what is encrypted.

  • No bank login
  • Entries stored on your phone by default
  • No ads, no selling your data
  • PIN & biometric app lock

Frequently asked questions

Ready to take control?

Rupix Finance Tracker is live on Google Play. Download it free and start tracking your money: no bank login, no ads, and your entries stay on your phone by default.